Difference between revisions of "Virtual Robot Interface & Environment"
(→Advanced topics) |
(→Menu Bar) |
||
| (102 intermediate revisions by 4 users not shown) | |||
| Line 5: | Line 5: | ||
[[Virtual Robot]] provides a simple to use web based tool for content creation on EA robots like RoboThespian and Socibot. | [[Virtual Robot]] provides a simple to use web based tool for content creation on EA robots like RoboThespian and Socibot. | ||
| − | This page introduces the Virtual Robot interface and working environment. | + | This page introduces the Virtual Robot interface and working environment and the terminology used. |
| − | + | If you are new to Virtual Robot please start with the [[Virtual Robot Quickstart]] - a jargon free quickstart guide to creating and transferring an animation to your robot. Then return here to get a deeper understanding of the interface and the terminology used. | |
| + | |||
| + | Explore the links at the bottom of the page to create more complex animations, animate multiple robots in sync and learn about Virtual Robot in more depth. | ||
All EA robots are shipped with a basic Virtual Robot account enabled you can access it [http://virtual.robothespian.co.uk here], login required. | All EA robots are shipped with a basic Virtual Robot account enabled you can access it [http://virtual.robothespian.co.uk here], login required. | ||
| Line 15: | Line 17: | ||
If you don't know your Virtual Robot login details [mailto:info@engineeredarts.co.uk contact Engineered Arts Ltd] | If you don't know your Virtual Robot login details [mailto:info@engineeredarts.co.uk contact Engineered Arts Ltd] | ||
| − | == | + | == Interface and Environment == |
| + | The Virtual Robot interface is divided into several sub areas: | ||
| + | |||
| + | <div><ul> | ||
| + | <li style="display: inline-block;">[[File:1920-VRScreen-layout.png|thumb|none|800px|link=|The Virtual Robot Interface]]</li> | ||
| + | </ul></div> | ||
| − | + | # '''Menu Bar''' - file controls, login details and a lot more functionalities which are detailed below. | |
| + | # '''Staging area''' - control and pose RoboThespian using your mouse. | ||
| + | # '''Library''' - comes packed with pre-installed content for you to drag and drop into the timeline. | ||
| + | # '''Timeline''' - arrange poses, audio components and speech to create your own robot performance. | ||
| + | # '''Inspector''' - real-time readouts of actuator data and view key frame data. | ||
| − | + | Here we provide a detailed guide to how these various elements combine to create an intuitive interface for animating a robot. | |
| − | + | ==Menu Bar== | |
| + | The menu bar is designed to be similar to most desktop applications. | ||
| − | + | It sits at the top of the page, usually just under your browser's bookmarks or address bar. Throughout the documentation it will be referred to like so: Help > Documentation, that means click on the menu item Help and then the sub-item Documentation, which is probably how you got here. | |
| + | <div><ul> | ||
| + | <li style="display: inline-block;">[[File:800x200-VR-menu-bar.png|thumb|none|800px|link=|Menu Bar]]</li> | ||
| + | </ul></div> | ||
| − | + | * '''File''' | |
| + | ** New - start a new performance | ||
| + | ** Open File... open a previous performance (keyboard shortcut: L Crtl + O) | ||
| + | ** Save File - save the current performance (keyboard shortcut: L Crtl + S) | ||
| + | ** Save As... - save current performance with a different name (i.e. rename) | ||
| + | ** Save Copy As... - Save a copy of the current performance | ||
| + | ** Get Perma-link - get a link to this performance which you can bookmark for quick access. | ||
| + | ** Convert To - Switch to a different robot model, keeping existing animation for compatible inputs. | ||
| + | ** Transfer - [[Virtual_Robot_-_Transferring_Content| transfer performances to real robots]] | ||
| + | * '''Edit''' - Undo, Redo, Copy, Paste | ||
| + | ** Generate - generates lipsync, blinking and eyelids | ||
| + | ** Preferences - opens the Preferences window | ||
| + | * '''Robots''' - [[Virtual_Robot_Quickstart#Select_your_robot_model|Select the robot model]] to animate | ||
| + | * '''View''' - Tick / Untick view options: | ||
| + | ** Follow Focused Item - as the item in focus moves, the camera moves with it | ||
| + | ** Lock Camera - locks current view | ||
| + | ** Show Animation Toolbox - opens the [[#Animation Toolbox| Animation Toolbox]] | ||
| + | * '''Control''' - Lock Unselected Inputs - when this option is ticked only the parts of the robot selected in the Animation Toolbox will move | ||
| + | * '''Select''' - Select All, Deselect All, Invert Selection | ||
| + | * '''Help''' | ||
| + | ** Check session - Checks that your session is active | ||
| + | ** Documentation - Links to the wiki for help and advice | ||
| − | + | == Staging area == | |
| + | This is the main area where you can view the robot, watch a performance play, or create new poses. | ||
<div><ul> | <div><ul> | ||
| − | <li style="display: inline-block;">[[File: | + | <li style="display: inline-block;">[[File:VRScreen_staging.jpg|thumb|none|800px|link=|The Staging Area]]</li> |
</ul></div> | </ul></div> | ||
| − | # Menu | + | # '''Mirror Eyes Button''' - Toggle this on/off to control eyes individually or with mirroring function. |
| − | # | + | # '''Eye Graphics Drop Down Menu''' - Select animatable or static eye graphics from the list. |
| − | # | + | # '''Light Colour Selector''' - Click on the robots Head, Torso, Arms and Legs (they will highlight blue), then click the drop down button. |
| − | # | + | # '''Lights selector / Colour Cursor''' - Move this point around to select you desired colour for the selected body part. |
| − | # | + | # '''Slider''' - Adjusts the light brightness for the selected body part. |
| + | # '''Robot''' - Click and drag on limbs to move. Click on areas to set colour. | ||
| − | + | ===Camera=== | |
| + | * Click and drag anywhere in the staging area except on the robot to change the camera angle. | ||
| + | * Double-click on any part of the robot to focus on that part, (double-click on the background to reset). | ||
| + | * Use the mouse scroll wheel (or equivalent laptop function) to zoom in and out of your focused item. | ||
| − | === | + | ===Robot=== |
| + | * Click and drag on any part of the robot (limbs, fingers, head, etc) in order to position the robot how you like. | ||
| + | * Alternative movements are accessible by middle clicking ''(or holding shift/ctrl whilst clicking)'' and dragging. | ||
| − | + | ===Creating Poses - introduction=== | |
| + | * You can create poses by moving the robot parts (limbs, fingers, head, etc) to the desired position and by adding a new keyframe you can save that position in the timeline (make sure that the parts you have moved are selected in the Animation Toolbox). | ||
| + | * The top menu contains some useful options for changing eye animations and body LED colours. For a detailed guide to pose editing, see [[#Posing_the_robot| posing the robot]]. | ||
| + | * Shortcuts: Double clicking on the head will bring up the Head sequences tab, on an arm will bring up the Pose tab, and on the jaw will open the Speech tab. | ||
| + | == Library == | ||
<div><ul> | <div><ul> | ||
| − | <li style="display: inline-block;">[[File: | + | <li style="display: inline-block;">[[File:800-VR-the-libraray.png|thumb|none|800px|link=|The Library]]</li> |
</ul></div> | </ul></div> | ||
| − | + | The Library section of Virtual Robot is a place for any clips which a Project requires, or has available. To add ANY type of Library item, to the timeline, you can simply drag and drop from the list in the Library to any time in the timeline. | |
| − | |||
| − | |||
| − | |||
| − | === | + | === Pose === |
| − | + | Short pre-created animation content which you can drag onto the timeline to view. Includes useful gestrures like "point left", "point right", "Wave right" etc. This will likely be changing in the future. | |
| − | + | === Head === | |
| − | |||
| − | |||
| − | + | Head gestures e.g. "Head Nod" and movements e.g. "Head Left" | |
| − | |||
| − | |||
| − | |||
| − | |||
| − | |||
| + | === Eyes === | ||
| − | + | Eye expressions e.g. "Angry Eyes", movements e.g. "Eyes Right" and "Blink" | |
| − | |||
| − | |||
| − | |||
| − | + | === Cheeks === | |
| − | + | Basic cheek colours for the face e.g. "Cheeks Red". | |
| − | + | Note that any colour can also be selected from the Lights selector / Colour Cursor (item 4. in [[#Staging area| Staging area section above]]) | |
| − | === | + | === Audio === |
| − | + | Library of any sound files you have uploaded. | |
| − | + | Drag sound files from your desktop or file-browser onto the list to upload. | |
| − | + | Almost all audio file types should be supported. If you have the file available in a 'lossless' format (e.g. flac/alac) we recommend using that for best results. Otherwise upload whatever file you have access to. Encode the file as few times as possible! Virtual Robot encodes the file to .ogg format when it's uploaded. | |
| − | + | To remove an audio file from the library click the red X next to the audio file. Pressing the delete key when it's highlighted will remove that sequence from the timeline if it exists. | |
| − | + | Note removing audio from the library removes it from Virtual Robot completely - it removes it from sequences as well. | |
| − | === | + | === Speech === |
| + | The 'Speech' section contains any text-to-speech content used (or available) to the current Project. | ||
| − | + | From this pane you can create new text-to-speech clips, by typing in the large box. | |
| − | + | You can add this speech to the end of your timeline by pressing the 'Append' button. | |
| − | + | You can also add the speech at the location of the Timeline marker using the 'Add at Marker' button. | |
| − | + | There are various options for adjusting the sound of the speech, '''Language, Voice, and 'Mood'''' are all available as drop-downs above the textbox. | |
| − | + | '''Volume, Speed, and Shaping''' can be fine-tuned by you however you like, the Speed option is especially useful for tweaking speech to music or existing animation (but don't forget that the normal setting is in the middle of the bar). | |
| − | + | In the list you can organise your Speech into folders. Use the Delete key to delete anything you no longer want to use. | |
| − | + | '''Deselect any Speech items to reset the form to it's default values.''' | |
Text to speech input. Key below: | Text to speech input. Key below: | ||
| Line 116: | Line 152: | ||
</ul></div> | </ul></div> | ||
| − | # Language | + | # '''Language''' |
| − | # Voice selection (number of voices available depends upon language). | + | # '''Voice selection''' (number of voices available depends upon language). |
| − | # Voice style - some voices (especially US English) have optional speech modulations, eg mood, age, character. | + | # '''Voice style''' - some voices (especially US English) have optional speech modulations, eg mood, age, character. |
| − | # Text input - enter your desired speech here, and press 'Add Speech' at the bottom right to insert into the timeline. | + | # '''Text input''' - enter your desired speech here, and press 'Add Speech' at the bottom right to insert into the timeline. |
| − | # Volume - adjust the volume of the tts component. | + | # '''Volume''' - adjust the volume of the tts component. |
| − | # Speed - adjust the speed. | + | # '''Speed''' - adjust the speed. |
| − | # Shaping - how much inflection is given to the tts component. | + | # '''Shaping''' - how much inflection is given to the tts component. |
| − | # Lypsync Gain - Control the range of motion for the jaw | + | # '''Lypsync Gain''' - Control the range of motion for the jaw |
| − | # Append & Add at Marker - Add tts component to the speech track. | + | # '''Append''' & '''Add at Marker''' - Add tts component to the speech track. |
| − | # Expand | + | # '''Hide or Expand the Library Area''' - click on the white section to Hide or Expand the Library Area |
Like the pre-composed elements, tts segments will reflect their true length when dropped into the timeline, however it may take a few moments for the engine to calculate the length. | Like the pre-composed elements, tts segments will reflect their true length when dropped into the timeline, however it may take a few moments for the engine to calculate the length. | ||
| − | === Timeline === | + | == Timeline == |
| + | |||
| + | The timeline lets you view, play and edit complete performances. | ||
| + | |||
| + | <div><ul> | ||
| + | <li style="display: inline-block;">[[File:Timeline_menu_annotated.png|thumb|none|800px|link=|The timeline - annotated]]</li> | ||
| + | </ul></div> | ||
| + | |||
| + | # '''Animation Toolbox''' - Open/Close the floating [[#Animation_Toolbox| Animation Toolbox ]] ''(detailed description in later section)''. | ||
| + | # '''Item / Frames / Graph View''' (Current mode highlighted in orange. Each mode offers different ways to edit. See: [[#Interpolation Iypes | interpolation types]]) | ||
| + | # '''Restart''' your performance. Restart plays from the beginning. | ||
| + | # '''Current time''' - in seconds of green marker position, can be edited from here. | ||
| + | # '''Play/Pause''' your performance. | ||
| + | # '''Toggle Repeat''' when enabled your performance will loop after it's finished playing. | ||
| + | # '''Reset''' - Resets the virtual robot to it's default start pose. | ||
| + | # '''New Track''' - Allows you to add a new track (motion, audio, speech or lipsync). | ||
| + | # '''Green Timeline Marker''' - move the timeline marker by dragging the rectangle at the top. | ||
| + | # '''Motion Item''' - this is a sequence timeline item which contains robot animation. | ||
| + | # '''Audio Item''' - this is an audio clip. | ||
| + | # '''Speech Item''' - this is an text to speech clip. | ||
| + | # '''Lipsync Item''' - this is a sequence timeline item which only contains lip movement. | ||
| + | # '''Track Type & Names''' - click the checkbox to disable a track, the names can be edited also by clicking on them. | ||
| + | # '''Track Drop-down''' - clicking this brings up more buttons related to the track: | ||
| + | ## '''Show Details''' - shows more information about audio tracks. | ||
| + | ## '''Shift Up''' - shifts track upwards. | ||
| + | ## '''Shift Down''' - shifts track downwards. | ||
| + | ## '''Delete''' - deletes the track | ||
| + | |||
| + | ===Adding Pre-Made Content=== | ||
| + | Drag Library elements into the timeline area where you wish to insert them. You can drag elements to reorder them. | ||
| + | |||
| + | Audio files such as your own mp3 files can be dragged directly into the timeline from your computer's desktop or file system. | ||
| + | |||
| + | Audio files can also be added from the audio tab in the library. | ||
| + | |||
| + | Text to Speech (tts) items are created at the markers current position or appended to the last one in the timeline if it exists. | ||
| − | + | A lipsync data item is automatically created and is linked to the tts items. | |
| + | '''NOTE''': If a tts item is deleted, the linked '''lipsync data item will remain''' and will also need to be deleted '''if''' not required. | ||
| + | |||
| + | ====Making Pre-Made Content Editable (and Playable) on Real Robot==== | ||
| + | |||
| + | Currently library elements are a reference to a sequence on the real robot. However not all robots will have the sequence installed on the robot. | ||
| + | |||
| + | To ensure Library elements play on all real robots they must be made editable. This converts them from a reference to a sequence of actual outputs that will play on any robot. | ||
| + | |||
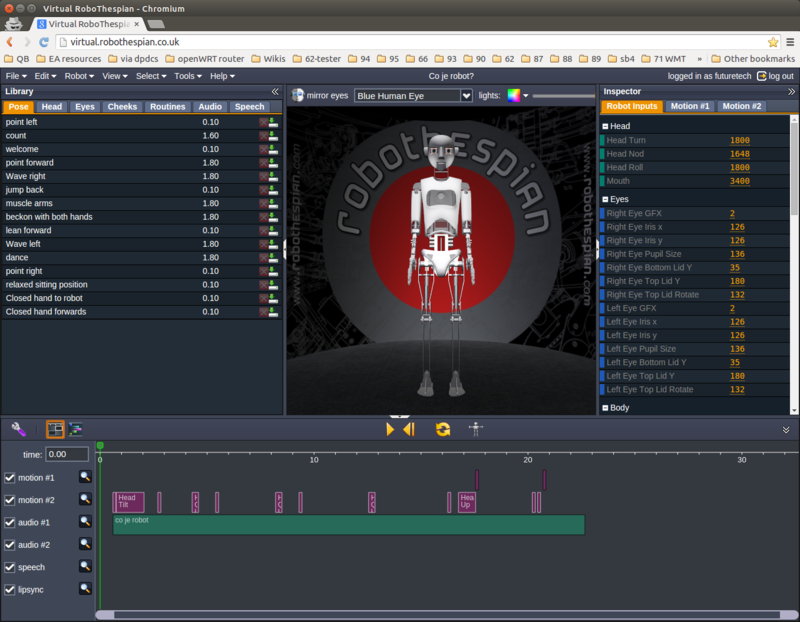
| + | If an item in the timeline is pink it is not editable and might not work on your robot. Press the E key to make them editable. | ||
<div><ul> | <div><ul> | ||
| − | <li style="display: inline-block;">[[File: | + | <li style="display: inline-block;">[[File:Reference_sequences_pink-wont-play-on-robot.png|thumb|none|800px|link=|Library elements pink = references (might not play on real robot)]]</li> |
| − | |||
| − | |||
</ul></div> | </ul></div> | ||
| − | + | <div><ul> | |
| − | + | <li style="display: inline-block;">[[File:library-elements-blue-editable.png|thumb|none|801px|link=|Library elements blue = editable (will play on real robot)]]</li> | |
| − | + | </ul></div> | |
| − | |||
| − | |||
| − | |||
| − | |||
| − | |||
| − | |||
| − | |||
| − | |||
| − | |||
| − | |||
| − | |||
| − | |||
| − | |||
| − | + | Step by step: | |
| + | # Click on any timeline clip to enter clip selection mode. | ||
| + | # Press Ctrl + A or go to Select > Select All. | ||
| + | # Press the E key. | ||
| + | # All pink items should turn blue to show they are editable. | ||
| + | # Be sure to save the performance. | ||
| − | + | === Animation Toolbox === | |
The animation toolbox provides a selection of tools (upper row) and body part filters (lower row). its a floating toolbox, so can be moved around the browser and placed anywhere you like. | The animation toolbox provides a selection of tools (upper row) and body part filters (lower row). its a floating toolbox, so can be moved around the browser and placed anywhere you like. | ||
| − | |||
| + | Tools are ordered from Left to Right. | ||
| + | |||
| + | Keyboard short cuts for each button display when hovering the mouse over the button. | ||
| + | |||
| + | Top row buttons are general animation controls. | ||
| + | |||
| + | The bottom row buttons select or deselect hardware outputs specific to each robot. They are toggle buttons. If you wish to only add or remove keys for the body, then only toggle the body selection, and so on. This is useful for creating animation in passes or for isolating problems with movement. | ||
| + | |||
| + | Click on a bottom row button to select - it will be highlighted with background colour (see last image below). | ||
| + | |||
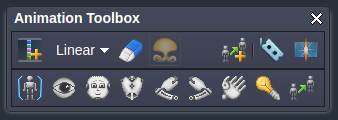
| + | The toolbox features are robot specific, but similar: | ||
| + | |||
| + | <div><ul> | ||
| + | <li style="display: inline-block;">[[File:Animation Toolbox - RoboThespian.png|thumb|none|800px|link=|RoboThespian Animation Toolbox]]</li> | ||
| + | <li style="display: inline-block;">[[File:Animation Toolbox - SociBot.png|thumb|none|800px|link=|SociBot Animation Toolbox]]</li> | ||
| + | <li style="display: inline-block;">[[File:Animation Toolbox - RoboThespian4 with InYaFace - all body parts enabled.png|thumb|none|800px|link=|RoboThespian with InYaFace (projected face), '''all body parts enabled.''']]</li> | ||
| + | </ul></div> | ||
| + | |||
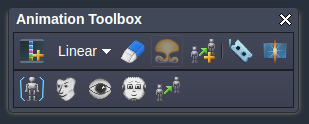
| + | ====Controls==== | ||
<div><ul> | <div><ul> | ||
| − | <li style="display: inline-block;">[[File: | + | <li style="display: inline-block;">[[File:Toolbox_annotated.png|thumb|none|800px|link=|Animation Toolbox - labelled]]</li> |
| + | <li style="display: inline-block;">[[File:Toolbox_interp.png|thumb|none|800px|link=|Toolbox - '''interpolation dropdown'''.]]</li> | ||
</ul></div> | </ul></div> | ||
| − | + | # '''Add Key Frame''' - Adds current robot pose at current marker position based on filter selection. | |
| − | + | # '''Interpolation Type''' - Chose between Stepped/Linear/Curve interpolation types. | |
| − | + | # '''Remove Key Frame''' - Removes the key pose at current marker position based on body row selection. | |
| − | + | # '''Remove All Key Poses''' - Removes all keys poses in selected timeline item based on filter selection. | |
| − | + | # '''Add single Input''' - Create an input to trigger external devices, such as a sequence on another robot. | |
| − | + | # '''Slice''' - Slice selected item at current marker position. | |
| − | + | # '''Weld''' - Weld selected item at current marker position. | |
| − | + | # '''X''' - Close Animation Toolbox | |
| − | + | # '''Select All/None''' - toggle all possible inputs listed below (Head, Face, Eyes etc.) on or off | |
| + | # '''Eyes''' - toggle eye inputs | ||
| + | # '''Head''' - toggle head inputs | ||
| + | # '''Body''' - toggle body (torso) inputs | ||
| + | # '''Right Arm''' - toggle right arm inputs | ||
| + | # '''Left Arm''' - toggle left arm inputs | ||
| + | # '''Hands''' - toggle hand and finger inputs | ||
| + | # '''Lights''' - toggle cheek and body lighting inputs | ||
| + | # '''Add single Input''' - Create an input to trigger external devices, such as a sequence on another robot. | ||
| + | |||
| + | ==== Item Selection ==== | ||
| + | |||
| + | Items on the timeline (motion data, audio & TTS clips) can be selected by LMB clicking on them. Whilst an item is selected, holding LMB and dragging left and right, allows an item to be moved. | ||
| + | Multiple items can be selected and manipulated by LMB clicking to select, holding CTRL to add to selection, and holding CTRL + SHIFT to add range in a single track. | ||
| + | |||
| − | === | + | === Interpolation Types === |
| − | + | ||
| − | + | Individual keyframes are distinguished by a marker within the timeline element. They are not necessarily evenly spaced, as they correspond to times in the animation. Any keyframe can have an '''interpolation'''. Which is one of '''Step''', '''Linear''', or '''Curve'''. This interpolation controls how the robot moves in-between these keyframes. | |
| − | + | ||
| − | + | ''The default and simplest type of interpolation is Linear.'' | |
| − | + | ||
| − | + | This is a good time to introduce the '''Frames''' timeline view. You can access this view using the button on the timeline's toolbar, or by pressing '''V''', or by double clicking a sequence (blue) element. | |
| − | + | ||
| − | + | <div><ul> | |
| − | + | <li style="display: inline-block;">[[File:Timeline_frames.png|thumb|none|800px|link=|The '''Frames''' timeline view]]</li> | |
| + | </ul></div> | ||
| + | In the above screenshot you can see keyframes with '''Step''', '''Linear''', and '''Curve''' interpolation. | ||
| − | + | ''Grey keyframes are keyframes that exist, but are for inputs which you've not got selected currently. Use the body parts in the animation toolbox to select different inputs, or double click on a grey keyframe.'' | |
| − | + | * '''Step-Denoted by a square''' | |
| + | ** Interpolation keeps the position the same until another keyframe changes it. | ||
| + | ** This results in jumpy movements, but can be very useful for blocking out initial poses. | ||
| − | + | * '''Linear-Denoted by a diamond.''' | |
| − | + | ** Interpolation smoothly changes the pose from the position of one keyframe, until the next. | |
| + | ** This results in smoother movements, but can still feel a bit ''robotic''. | ||
| + | * '''Curve-Denoted by a circle''' | ||
| + | ** Interpolation is smooth ''(like Linear)'', but varies the movement speeds depending on the position of it's '''handles'''. | ||
| + | ** This provides the most flexibility for animation, but can be a bit complicated. | ||
| − | + | ''Whilst '''Curve''' interpolation can produce more detailed or life-like animation. It's usage is not always necessary and can result in a complicated workflow.'' | |
| − | + | The way in which these interpolation types control motion can be visualised using the '''Graph''' view. You can access this view using the button on the timeline's toolbar, or by pressing '''V''' several times when a sequence is selected. | |
<div><ul> | <div><ul> | ||
| − | <li style="display: inline-block;">[[File: | + | <li style="display: inline-block;">[[File:Timeline_curves.png|thumb|none|800px|link=|The '''Graph''' timeline view of the same animation]]</li> |
</ul></div> | </ul></div> | ||
| − | + | This view is where you can move the curve interpolation's handles. ''These work similarly to pen tools in many drawing applications you may have used before.'' The pose of the robot moves from keyframe-to-keyframe, and the speed at which this occurs can be adjusted using the small white handles. The key to using these effectively is understanding how they affect the robot's '''acceleration''' in your animation. The acceleration and speed of a character's movements convey as much (if not more) of their emotion than the poses which are used. | |
| + | |||
| + | You can change the interpolation type of existing keyframes, by selecting the keyframes you wish to change, and choosing an interpolation from the [[#Animation_Toolbox| Animation Toolbox ]] drop down list. | ||
| + | |||
| + | == Inspector == | ||
| + | The right slideable window gives a list of all hardware outputs. You may want to directly control these outputs for more accurate poses. | ||
<div><ul> | <div><ul> | ||
| − | <li style="display: inline-block;">[[File: | + | <li style="display: inline-block;">[[File:inspector.png|thumb|none|800px|link=|Menu Bar]]</li> |
</ul></div> | </ul></div> | ||
| − | + | * Click and drag on an output name to change the value. | |
| + | * Click on the value itself to type a new one. | ||
| − | + | You will be able to see how changing these values alters the pose of the robot as you do it. And vice-versa you can see how moving the robot changes the values. | |
| − | + | These values are useful for getting exact mirroring with certain movements, two arms moving to the exact same place for example. However this can make the robot feel less natural. | |
| − | + | White outputs are selected and will be saved to the timeline when creating animation keyframes. It is often useful to have a minimal number of these selected when animating, to help you create smoother motions. See the Tips page for more animation help! | |
| − | + | ===Robot Inputs examples - SociBot Kiosk and RoboThespian4 === | |
| + | Each of the robots' inputs are split into the following categories/body-parts. These will be visible in the Animation Toolbox. And in the Inspector. | ||
| − | + | Socibot Kiosk | |
| − | + | * Face | |
| + | * Eyes | ||
| + | * Head | ||
| − | == Posing | + | RoboThespian4 |
| + | |||
| + | * Head | ||
| + | * Eyes | ||
| + | * Body | ||
| + | * Left Arm | ||
| + | * Right Arm | ||
| + | * Hands | ||
| + | * Lights | ||
| + | |||
| + | == Posing RoboThespian == | ||
Most robot elements can be controlled with the mouse alone. The following is a list of parts, their controllable aspects or axes, and how to move each one. | Most robot elements can be controlled with the mouse alone. The following is a list of parts, their controllable aspects or axes, and how to move each one. | ||
| Line 282: | Line 412: | ||
|} | |} | ||
| + | ===Posing SociBot=== | ||
| + | SociBot has 3 axes of movement in the head. To move them: | ||
| + | |||
| + | * Head Yaw (Turn) and Pitch (Nod): Left Click and drag on the head shell. | ||
| + | * Head Roll (Tilt): Alternate Click* and drag on the head shell. | ||
| + | |||
| + | Alternate click = Middle click or Shift + Left click or Ctrl + Left click | ||
| + | |||
| + | As with all robots with projector based faces SociBots have InYaFace support. See the InYaFace page for more information. | ||
== Creating a simple animation == | == Creating a simple animation == | ||
| − | + | If you are completely new to Virtual Robot please start with the [[Virtual Robot Quickstart]] - a jargon free quickstart guide to creating and transferring an animation to your robot. Then return here to get a deeper understanding of the interface and the terminology used. | |
== Transferring animation to your robot == | == Transferring animation to your robot == | ||
Once you have created a new performance on Virtual Robot, you will want to see it working on a real robot. It's easy to transfer to your robot, even if the robot is in a different part of the world. Please see [[Virtual Robot - Transferring Content]] | Once you have created a new performance on Virtual Robot, you will want to see it working on a real robot. It's easy to transfer to your robot, even if the robot is in a different part of the world. Please see [[Virtual Robot - Transferring Content]] | ||
| − | == Further | + | == Further Documentation and Tutorials == |
| − | + | Now that you are familiar with the Virtual Robot Interface and Environment, and have been through the [[Virtual Robot Quickstart|Quickstart]] learn in more detail: | |
| − | + | {{#lst:Virtual_Robot|further_vr_links}} | |
| − | |||
| − | |||
| − | |||
| − | |||
| − | |||
| − | |||
==Ongoing Development and New Features == | ==Ongoing Development and New Features == | ||
Latest revision as of 08:11, 23 October 2018
Virtual Robot > Interface & Environment
Contents
Introduction
Virtual Robot provides a simple to use web based tool for content creation on EA robots like RoboThespian and Socibot.
This page introduces the Virtual Robot interface and working environment and the terminology used.
If you are new to Virtual Robot please start with the Virtual Robot Quickstart - a jargon free quickstart guide to creating and transferring an animation to your robot. Then return here to get a deeper understanding of the interface and the terminology used.
Explore the links at the bottom of the page to create more complex animations, animate multiple robots in sync and learn about Virtual Robot in more depth.
All EA robots are shipped with a basic Virtual Robot account enabled you can access it here, login required.
You may want to open your Virtual Robot in another window while you read these pages.
If you don't know your Virtual Robot login details contact Engineered Arts Ltd
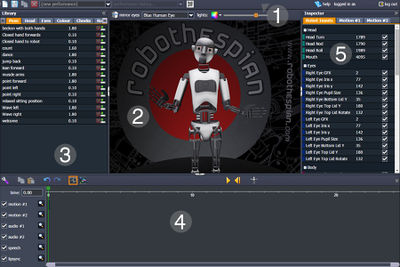
Interface and Environment
The Virtual Robot interface is divided into several sub areas:
- Menu Bar - file controls, login details and a lot more functionalities which are detailed below.
- Staging area - control and pose RoboThespian using your mouse.
- Library - comes packed with pre-installed content for you to drag and drop into the timeline.
- Timeline - arrange poses, audio components and speech to create your own robot performance.
- Inspector - real-time readouts of actuator data and view key frame data.
Here we provide a detailed guide to how these various elements combine to create an intuitive interface for animating a robot.
Menu Bar
The menu bar is designed to be similar to most desktop applications.
It sits at the top of the page, usually just under your browser's bookmarks or address bar. Throughout the documentation it will be referred to like so: Help > Documentation, that means click on the menu item Help and then the sub-item Documentation, which is probably how you got here.

- File
- New - start a new performance
- Open File... open a previous performance (keyboard shortcut: L Crtl + O)
- Save File - save the current performance (keyboard shortcut: L Crtl + S)
- Save As... - save current performance with a different name (i.e. rename)
- Save Copy As... - Save a copy of the current performance
- Get Perma-link - get a link to this performance which you can bookmark for quick access.
- Convert To - Switch to a different robot model, keeping existing animation for compatible inputs.
- Transfer - transfer performances to real robots
- Edit - Undo, Redo, Copy, Paste
- Generate - generates lipsync, blinking and eyelids
- Preferences - opens the Preferences window
- Robots - Select the robot model to animate
- View - Tick / Untick view options:
- Follow Focused Item - as the item in focus moves, the camera moves with it
- Lock Camera - locks current view
- Show Animation Toolbox - opens the Animation Toolbox
- Control - Lock Unselected Inputs - when this option is ticked only the parts of the robot selected in the Animation Toolbox will move
- Select - Select All, Deselect All, Invert Selection
- Help
- Check session - Checks that your session is active
- Documentation - Links to the wiki for help and advice
Staging area
This is the main area where you can view the robot, watch a performance play, or create new poses.
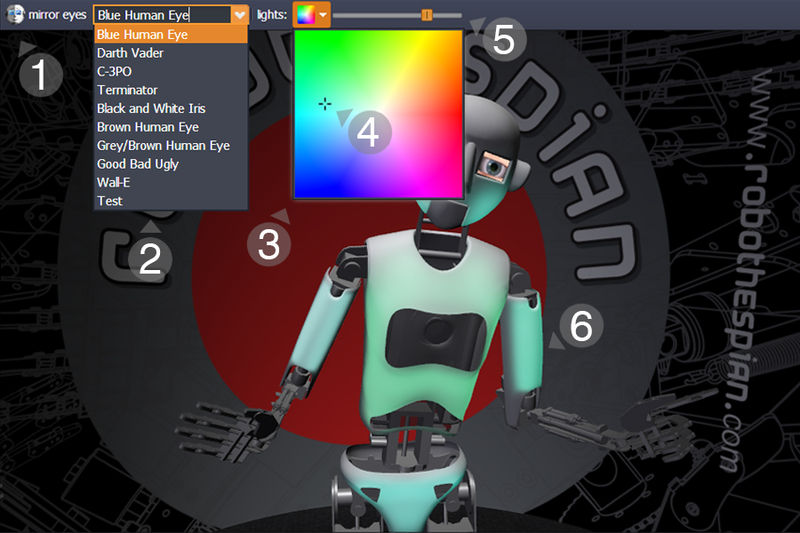
- Mirror Eyes Button - Toggle this on/off to control eyes individually or with mirroring function.
- Eye Graphics Drop Down Menu - Select animatable or static eye graphics from the list.
- Light Colour Selector - Click on the robots Head, Torso, Arms and Legs (they will highlight blue), then click the drop down button.
- Lights selector / Colour Cursor - Move this point around to select you desired colour for the selected body part.
- Slider - Adjusts the light brightness for the selected body part.
- Robot - Click and drag on limbs to move. Click on areas to set colour.
Camera
- Click and drag anywhere in the staging area except on the robot to change the camera angle.
- Double-click on any part of the robot to focus on that part, (double-click on the background to reset).
- Use the mouse scroll wheel (or equivalent laptop function) to zoom in and out of your focused item.
Robot
- Click and drag on any part of the robot (limbs, fingers, head, etc) in order to position the robot how you like.
- Alternative movements are accessible by middle clicking (or holding shift/ctrl whilst clicking) and dragging.
Creating Poses - introduction
- You can create poses by moving the robot parts (limbs, fingers, head, etc) to the desired position and by adding a new keyframe you can save that position in the timeline (make sure that the parts you have moved are selected in the Animation Toolbox).
- The top menu contains some useful options for changing eye animations and body LED colours. For a detailed guide to pose editing, see posing the robot.
- Shortcuts: Double clicking on the head will bring up the Head sequences tab, on an arm will bring up the Pose tab, and on the jaw will open the Speech tab.
Library
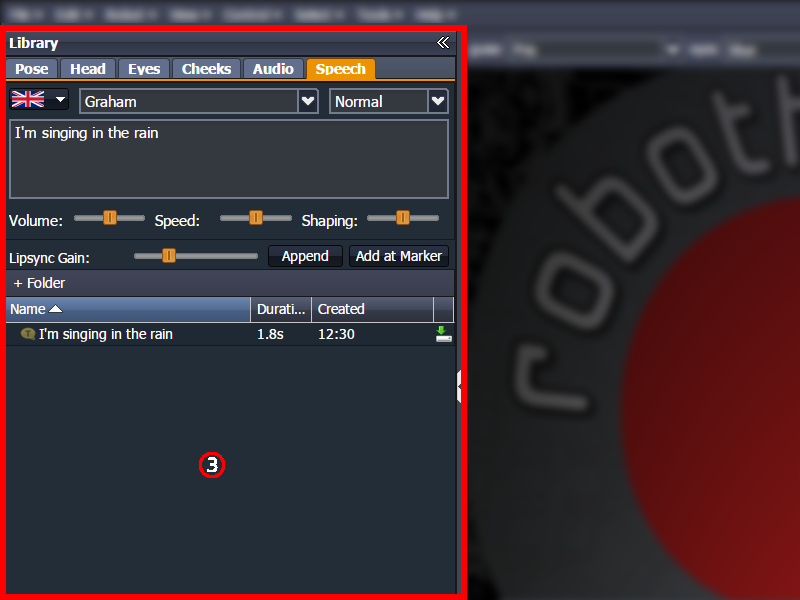
The Library section of Virtual Robot is a place for any clips which a Project requires, or has available. To add ANY type of Library item, to the timeline, you can simply drag and drop from the list in the Library to any time in the timeline.
Pose
Short pre-created animation content which you can drag onto the timeline to view. Includes useful gestrures like "point left", "point right", "Wave right" etc. This will likely be changing in the future.
Head
Head gestures e.g. "Head Nod" and movements e.g. "Head Left"
Eyes
Eye expressions e.g. "Angry Eyes", movements e.g. "Eyes Right" and "Blink"
Cheeks
Basic cheek colours for the face e.g. "Cheeks Red".
Note that any colour can also be selected from the Lights selector / Colour Cursor (item 4. in Staging area section above)
Audio
Library of any sound files you have uploaded.
Drag sound files from your desktop or file-browser onto the list to upload.
Almost all audio file types should be supported. If you have the file available in a 'lossless' format (e.g. flac/alac) we recommend using that for best results. Otherwise upload whatever file you have access to. Encode the file as few times as possible! Virtual Robot encodes the file to .ogg format when it's uploaded.
To remove an audio file from the library click the red X next to the audio file. Pressing the delete key when it's highlighted will remove that sequence from the timeline if it exists.
Note removing audio from the library removes it from Virtual Robot completely - it removes it from sequences as well.
Speech
The 'Speech' section contains any text-to-speech content used (or available) to the current Project.
From this pane you can create new text-to-speech clips, by typing in the large box.
You can add this speech to the end of your timeline by pressing the 'Append' button.
You can also add the speech at the location of the Timeline marker using the 'Add at Marker' button.
There are various options for adjusting the sound of the speech, Language, Voice, and 'Mood' are all available as drop-downs above the textbox.
Volume, Speed, and Shaping can be fine-tuned by you however you like, the Speed option is especially useful for tweaking speech to music or existing animation (but don't forget that the normal setting is in the middle of the bar).
In the list you can organise your Speech into folders. Use the Delete key to delete anything you no longer want to use.
Deselect any Speech items to reset the form to it's default values.
Text to speech input. Key below:

- Language
- Voice selection (number of voices available depends upon language).
- Voice style - some voices (especially US English) have optional speech modulations, eg mood, age, character.
- Text input - enter your desired speech here, and press 'Add Speech' at the bottom right to insert into the timeline.
- Volume - adjust the volume of the tts component.
- Speed - adjust the speed.
- Shaping - how much inflection is given to the tts component.
- Lypsync Gain - Control the range of motion for the jaw
- Append & Add at Marker - Add tts component to the speech track.
- Hide or Expand the Library Area - click on the white section to Hide or Expand the Library Area
Like the pre-composed elements, tts segments will reflect their true length when dropped into the timeline, however it may take a few moments for the engine to calculate the length.
Timeline
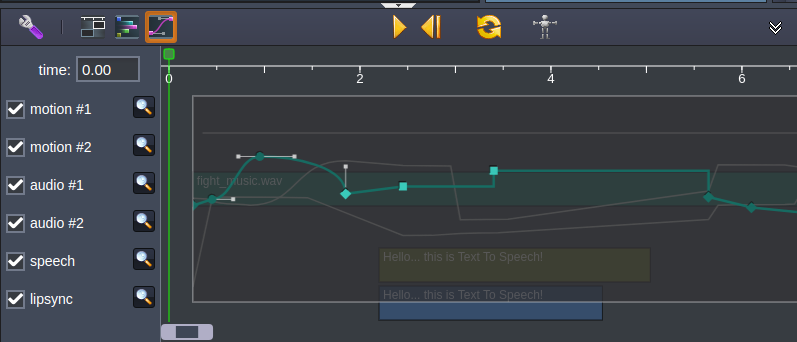
The timeline lets you view, play and edit complete performances.
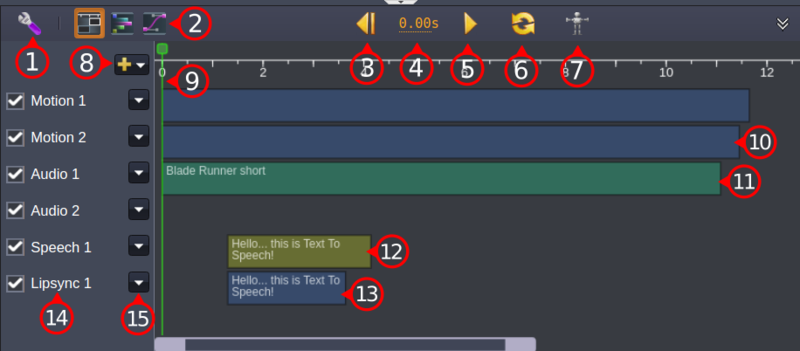
- Animation Toolbox - Open/Close the floating Animation Toolbox (detailed description in later section).
- Item / Frames / Graph View (Current mode highlighted in orange. Each mode offers different ways to edit. See: interpolation types)
- Restart your performance. Restart plays from the beginning.
- Current time - in seconds of green marker position, can be edited from here.
- Play/Pause your performance.
- Toggle Repeat when enabled your performance will loop after it's finished playing.
- Reset - Resets the virtual robot to it's default start pose.
- New Track - Allows you to add a new track (motion, audio, speech or lipsync).
- Green Timeline Marker - move the timeline marker by dragging the rectangle at the top.
- Motion Item - this is a sequence timeline item which contains robot animation.
- Audio Item - this is an audio clip.
- Speech Item - this is an text to speech clip.
- Lipsync Item - this is a sequence timeline item which only contains lip movement.
- Track Type & Names - click the checkbox to disable a track, the names can be edited also by clicking on them.
- Track Drop-down - clicking this brings up more buttons related to the track:
- Show Details - shows more information about audio tracks.
- Shift Up - shifts track upwards.
- Shift Down - shifts track downwards.
- Delete - deletes the track
Adding Pre-Made Content
Drag Library elements into the timeline area where you wish to insert them. You can drag elements to reorder them.
Audio files such as your own mp3 files can be dragged directly into the timeline from your computer's desktop or file system.
Audio files can also be added from the audio tab in the library.
Text to Speech (tts) items are created at the markers current position or appended to the last one in the timeline if it exists.
A lipsync data item is automatically created and is linked to the tts items.
NOTE: If a tts item is deleted, the linked lipsync data item will remain and will also need to be deleted if not required.
Making Pre-Made Content Editable (and Playable) on Real Robot
Currently library elements are a reference to a sequence on the real robot. However not all robots will have the sequence installed on the robot.
To ensure Library elements play on all real robots they must be made editable. This converts them from a reference to a sequence of actual outputs that will play on any robot.
If an item in the timeline is pink it is not editable and might not work on your robot. Press the E key to make them editable.
Step by step:
- Click on any timeline clip to enter clip selection mode.
- Press Ctrl + A or go to Select > Select All.
- Press the E key.
- All pink items should turn blue to show they are editable.
- Be sure to save the performance.
Animation Toolbox
The animation toolbox provides a selection of tools (upper row) and body part filters (lower row). its a floating toolbox, so can be moved around the browser and placed anywhere you like.
Tools are ordered from Left to Right.
Keyboard short cuts for each button display when hovering the mouse over the button.
Top row buttons are general animation controls.
The bottom row buttons select or deselect hardware outputs specific to each robot. They are toggle buttons. If you wish to only add or remove keys for the body, then only toggle the body selection, and so on. This is useful for creating animation in passes or for isolating problems with movement.
Click on a bottom row button to select - it will be highlighted with background colour (see last image below).
The toolbox features are robot specific, but similar:
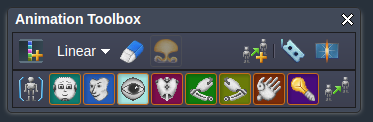
Controls
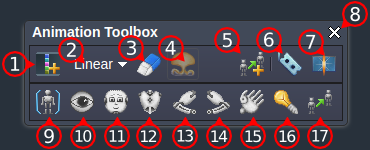
- Add Key Frame - Adds current robot pose at current marker position based on filter selection.
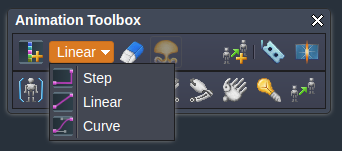
- Interpolation Type - Chose between Stepped/Linear/Curve interpolation types.
- Remove Key Frame - Removes the key pose at current marker position based on body row selection.
- Remove All Key Poses - Removes all keys poses in selected timeline item based on filter selection.
- Add single Input - Create an input to trigger external devices, such as a sequence on another robot.
- Slice - Slice selected item at current marker position.
- Weld - Weld selected item at current marker position.
- X - Close Animation Toolbox
- Select All/None - toggle all possible inputs listed below (Head, Face, Eyes etc.) on or off
- Eyes - toggle eye inputs
- Head - toggle head inputs
- Body - toggle body (torso) inputs
- Right Arm - toggle right arm inputs
- Left Arm - toggle left arm inputs
- Hands - toggle hand and finger inputs
- Lights - toggle cheek and body lighting inputs
- Add single Input - Create an input to trigger external devices, such as a sequence on another robot.
Item Selection
Items on the timeline (motion data, audio & TTS clips) can be selected by LMB clicking on them. Whilst an item is selected, holding LMB and dragging left and right, allows an item to be moved. Multiple items can be selected and manipulated by LMB clicking to select, holding CTRL to add to selection, and holding CTRL + SHIFT to add range in a single track.
Interpolation Types
Individual keyframes are distinguished by a marker within the timeline element. They are not necessarily evenly spaced, as they correspond to times in the animation. Any keyframe can have an interpolation. Which is one of Step, Linear, or Curve. This interpolation controls how the robot moves in-between these keyframes.
The default and simplest type of interpolation is Linear.
This is a good time to introduce the Frames timeline view. You can access this view using the button on the timeline's toolbar, or by pressing V, or by double clicking a sequence (blue) element.

In the above screenshot you can see keyframes with Step, Linear, and Curve interpolation.
Grey keyframes are keyframes that exist, but are for inputs which you've not got selected currently. Use the body parts in the animation toolbox to select different inputs, or double click on a grey keyframe.
- Step-Denoted by a square
- Interpolation keeps the position the same until another keyframe changes it.
- This results in jumpy movements, but can be very useful for blocking out initial poses.
- Linear-Denoted by a diamond.
- Interpolation smoothly changes the pose from the position of one keyframe, until the next.
- This results in smoother movements, but can still feel a bit robotic.
- Curve-Denoted by a circle
- Interpolation is smooth (like Linear), but varies the movement speeds depending on the position of it's handles.
- This provides the most flexibility for animation, but can be a bit complicated.
Whilst Curve interpolation can produce more detailed or life-like animation. It's usage is not always necessary and can result in a complicated workflow.
The way in which these interpolation types control motion can be visualised using the Graph view. You can access this view using the button on the timeline's toolbar, or by pressing V several times when a sequence is selected.
This view is where you can move the curve interpolation's handles. These work similarly to pen tools in many drawing applications you may have used before. The pose of the robot moves from keyframe-to-keyframe, and the speed at which this occurs can be adjusted using the small white handles. The key to using these effectively is understanding how they affect the robot's acceleration in your animation. The acceleration and speed of a character's movements convey as much (if not more) of their emotion than the poses which are used.
You can change the interpolation type of existing keyframes, by selecting the keyframes you wish to change, and choosing an interpolation from the Animation Toolbox drop down list.
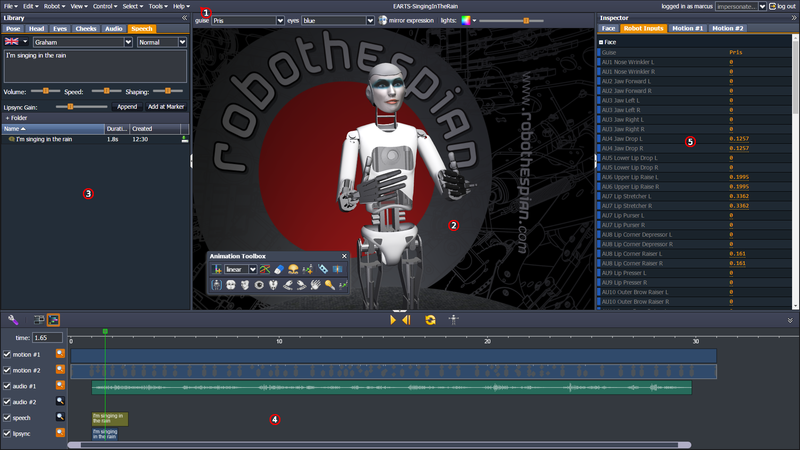
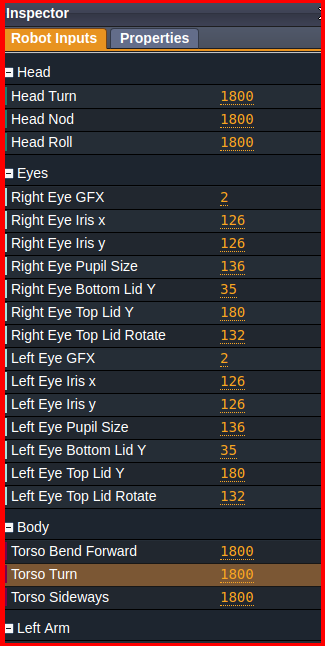
Inspector
The right slideable window gives a list of all hardware outputs. You may want to directly control these outputs for more accurate poses.
- Click and drag on an output name to change the value.
- Click on the value itself to type a new one.
You will be able to see how changing these values alters the pose of the robot as you do it. And vice-versa you can see how moving the robot changes the values.
These values are useful for getting exact mirroring with certain movements, two arms moving to the exact same place for example. However this can make the robot feel less natural.
White outputs are selected and will be saved to the timeline when creating animation keyframes. It is often useful to have a minimal number of these selected when animating, to help you create smoother motions. See the Tips page for more animation help!
Robot Inputs examples - SociBot Kiosk and RoboThespian4
Each of the robots' inputs are split into the following categories/body-parts. These will be visible in the Animation Toolbox. And in the Inspector.
Socibot Kiosk
- Face
- Eyes
- Head
RoboThespian4
- Head
- Eyes
- Body
- Left Arm
- Right Arm
- Hands
- Lights
Posing RoboThespian
Most robot elements can be controlled with the mouse alone. The following is a list of parts, their controllable aspects or axes, and how to move each one.
| Robot Part | Controllable feature | How to edit |
|---|---|---|
| Eyes | Iris position | Mouse: left click anywhere in the eyeball and hold the button down to drag the eyes to an appropriate position. |
| Eyes | Pupil size | Mouse+ctrl: left click on the iris or pupil while holding down the ctrl key on your keyboard. Dragging the mouse will increase or decrease pupil size. |
| Eyes | Graphics | A drop-down menu on the upper left of the pose screen lists graphical display options for the eyes. Be warned that not all of these will animate or have editable features. |
| Eyelids | Vertical position | Mouse: left click on the upper or lower eyelid and drag to position. |
| Eyelids | Tilt | Mouse+ctrl: left click on the upper or lower eyelid while holding down the ctrl key on your keyboard. Dragging the mouse will tilt the robot's eyelids up or down. |
| Eyes + Eyelids | Simultaneous editing | To the left of the dropdown graphics menu, there is a 'mirror eyes' toggle. This is on by default, and means that edits to one eye will be reflected in the other. To change an individual eye or eyelid, without affecting the other, toggle this option off. |
| Head | Yaw and pitch position | Mouse: left click and drag with the mouse to control yaw and pitch of the head. Lateral (x) mouse position controls yaw, vertical (y) controls the pitch. |
| Head | Roll position | Mouse+ctrl: left click on the head while holding down the ctrl key on your keyboard to edit the head rotation about the roll axis only. The other axes will be disabled when ctrl is held. |
| Head | Jaw | Mouse: Left click and drag the mouse to open or close the robot's jaw. This is a binary mode (open/closed) without interim positioning. |
| Head | Face LEDs | Drop-down colour menu/brightness slider: Click briefly on the head (it should flash blue to indicate it is selected). Using the drop down colour map on the upper menu bar, and the brightness slider tool, you can control the LED output for the robot cheeks. |
| Upper arm/shoulder | Yaw and pitch position | Mouse: left click on the upper arm or shoulder joint and drag to rotate the arm yaw or pitch. Lateral (x) mouse position controls the yaw (abduction/adduction of the arm), vertical (y) mouse position controls the pitch (raising or lowering the joint). For best and most precise results, use the shoulder joint for pitch control and the centre of the joint (around the bicep) for yaw control. Note that controlling yaw from the shoulder can cause overlap difficulties with body roll angle. |
| Upper arm/shoulder | Roll position | Mouse+ctrl: left click on the upper arm while holding down the ctrl key to control arm roll (pronation/supination). |
| Upper arm | Arm LEDs | Drop-down colour menu/brightness slider: Click briefly on the arm (it should flash blue to indicate it is selected). Using the drop down colour map on the upper menu bar, and the brightness slider tool, you can control the LED output for the arms separately. |
| Elbow | Pitch position | Mouse: left click on the forearm and drag along the vertical axis to control elbow pitch. Note that the elbow has only one true degree of freedom, however you can control the roll axis of the wrist (see Wrist/Roll) and the yaw axis of the shoulder from the forearm. |
| Wrist | Roll position | Mouse+ctrl: left click on the forearm or hand to control the roll axis of the wrist/hand. |
| Hand | Pitch position | Mouse: left click on the hand to control wrist pitch. Note that there is no yaw degree of freedom in the wrist on this RoboThespian model - lateral and vertical mouse movement both control wrist pitch only. Depending on the overall body pose, it may be more advantageous to switch between vertical or lateral motion to achieve the full sensitivity and precision. |
| Hand | Finger flexion | Mouse: Click on a finger to flex or extend it. Each finger has only one degree of freedom with two possible positions (fully extended or fully curved). |
| Torso | Roll and pitch position | Mouse: left clicking on the torso and dragging the mouse will change the pitch and roll of the robot torso. Lateral (x) mouse position controls the roll, vertical (y) mouse position controls the pitch. Note that these controls are sensitive to the yaw position of the upper body and for best results, rotate the camera frame so the robot is facing you. |
| Torso | Yaw position | Mouse+ctrl: left click on the torso while holding down the ctrl key to control yaw rotation of the upper body. |
| Torso | Body LEDs | Drop-down colour menu/brightness slider: Click briefly on the torso (it should flash blue to indicate it is selected). Using the drop down colour map on the upper menu bar, and the brightness slider tool, you can control the LED output for the torso. |
| Legs | Pelvis LEDs | Drop-down colour menu/brightness slider: Click briefly on the legs (they should flash blue to indicate they are selected). Using the drop down colour map on the upper menu bar, and the brightness slider tool, you can control the LED output for the pelvis. |
Posing SociBot
SociBot has 3 axes of movement in the head. To move them:
- Head Yaw (Turn) and Pitch (Nod): Left Click and drag on the head shell.
- Head Roll (Tilt): Alternate Click* and drag on the head shell.
Alternate click = Middle click or Shift + Left click or Ctrl + Left click
As with all robots with projector based faces SociBots have InYaFace support. See the InYaFace page for more information.
Creating a simple animation
If you are completely new to Virtual Robot please start with the Virtual Robot Quickstart - a jargon free quickstart guide to creating and transferring an animation to your robot. Then return here to get a deeper understanding of the interface and the terminology used.
Transferring animation to your robot
Once you have created a new performance on Virtual Robot, you will want to see it working on a real robot. It's easy to transfer to your robot, even if the robot is in a different part of the world. Please see Virtual Robot - Transferring Content
Further Documentation and Tutorials
Now that you are familiar with the Virtual Robot Interface and Environment, and have been through the Quickstart learn in more detail:
- Virtual Robot Content Organizer - Transferring Content to your robot
- Virtual Robot Tips & Tricks for Creating Performances
- Virtual Robot - Basic Guide to the Animation Pipeline
- Virtual Robot - Advanced Guide to the Animation Pipeline
- Virtual Robot - Animation Terms & Definitions
- Virtual Robot - Projected Face Animation Process
- Virtual Robot - Multi-Robot Performances
- Virtual Robot - Animating a Seated RoboThespian
- Virtual Robot Troubleshooting / Help!- it's not doing what it's supposed to!
- Virtual Robot - Converting robot model
- Virtual Robot - Limiting Controls for Simultaneous Actions
Ongoing Development and New Features
New features are being added to Virtual Robot all the time to offer increased functionality or improved ease of use.
As Virtual Robot is a web based tool these improvements are made available to you in real time without the need to install any updates.
Please see Virtual Robot - What's New
Troubleshooting
If Virtual Robot is not behaving as expected, or you experience any errors please see Virtual Robot Troubleshooting