Virtual Robot - Basic Guide to the Animation Pipeline
Virtual Robot > Basic Guide to the Animation Pipeline
Contents
Introduction
A good production process is essential if you are going to be creating large amounts of content using VR. Keeping your performances well organised using a consistent method of production is essential. You can animate in VR any way you like, but the following step by step guide is based on how we like to work. A methodical approach from beginning to end, building up layers of detail whilst saving incrementally.
Prepare to use VR
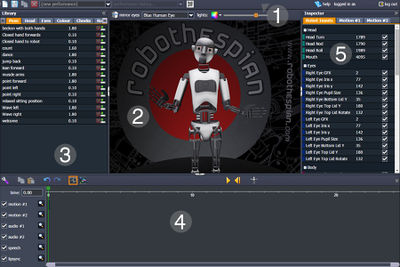
First things first, make sure you have read about the Virtual Robot Interface & Environment , so you become familiar with the user interface layout and the tools provided.
To create a performance you need a script. Once the script is finished, act it out. Work out which gestures work best for Robothespian to perform. Keeping in mind Robothespian has physical limitations, such as, raising his arms above the head, crossing the arms, pointing to itself, touching the chin etc. As you become familiar with VR and how it translates movements to Robothespian, you will learn what kind of movements work and look best.
When you have a good routine planned out on paper, act it out. Then film it. You can use the video as reference for gesture timing and also blinking. Audio files can be dropped into the timeline. We recommend using the .ogg file format which uploads quickly and is fully supported by VR and RT. If you are using Text to Speech to generate a script, organise the clips in the timeline before you start.
Ready to Animate
The process described in this page, is a basic pose to pose animation technique which works well in VR using the existing tools.
Working in passes will teach you a process which saves you time in the long run. As you complete each pass or series of passes, you can review and go back if needed to make changes at an early stage. As you progress to the later passes adding finer details, you should find you are familiar with how the project is constructed and be capable of accommodating any changes required.
A pass is the process of working through the timeline sequentially from beginning to end. Editing and working on key poses as you go. With each pass you are building up the level of detail adding life to a performance. Animation for TV, Films and Video Games is often created with a similar process but with more detail. VR is slightly simplified but does allow you to apply animation principles in a basic form.
To create your first animation using VR, follow these simple steps. We are going to make RT say 'Hello' and welcome people by gesturing. This guide is broken into three passes.
- Create key full body poses
- Add individual body part details
- Add eye animation
Setup a File
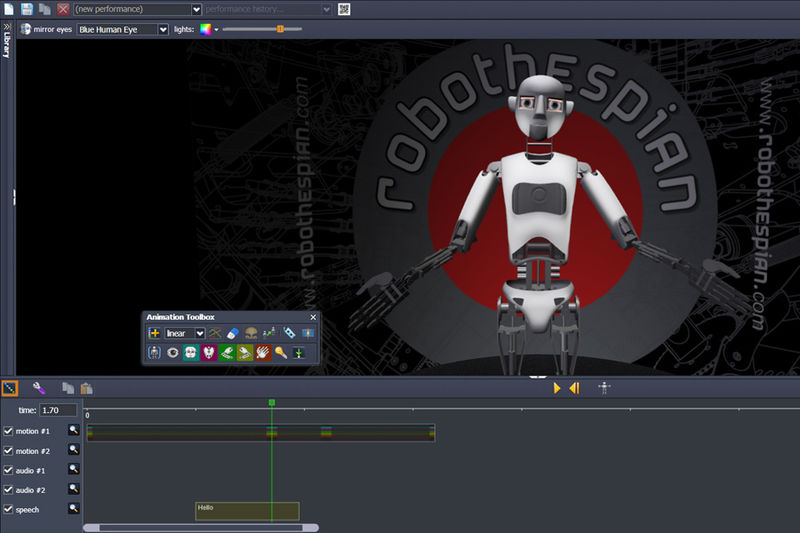
- Before we start, create a new performance and give it a name.
- Now add some audio. Import an .ogg file or use TTS to say 'Hello'.
- Move the audio clip, so it starts saying Hello at about 1.0 second.
Basic Passes
1st Animation Pass
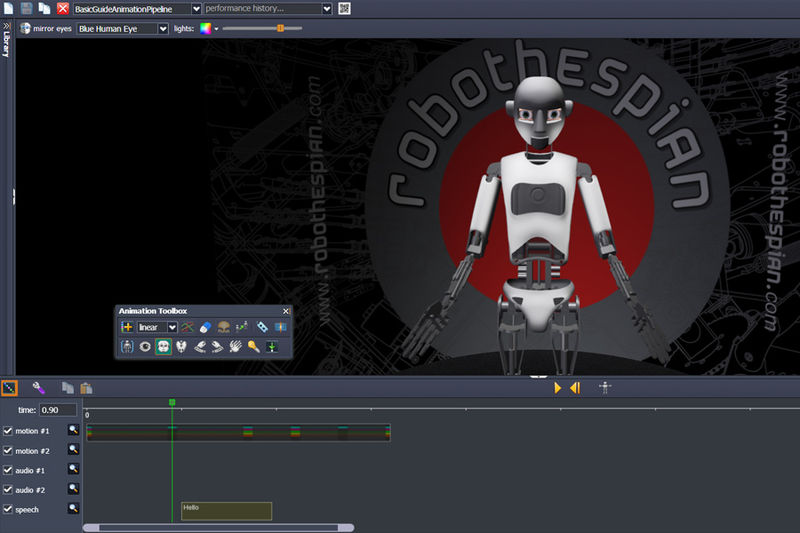
Here we will key the main poses for this animation. Work through the following actions in numerical order.
- Using the toolbox (click the Wrench Icon to open)
- Toggle on all the body part filters (except the eyes) to allow keyframes to be set.
- Move the play head to 0.0 seconds.
- Pose the robot in a generic starting pose (press 's' or press reset button to put robot in pre-set one).
- Click add keyframe when you are happy with your pose. Here you can also click toggle keyframes to view them more clearly.
- Move the timeline marker to just before the end of the word 'Hello'.
- Pose the robot in a welcoming pose with both arms out, palms facing upwards.
- Click add keyframe to save the pose.
- If you double click the frame you already made you go into more detail about that frame.
- If you add a keyframe then it'll treat it like one clip, better for interpolation.
- Move the timeline marker forward half a second.
- Click add keyframe again (this should duplicate the last pose).
- Move the timeline marker forward to about 1 second after that.
- Pose the robot in a generic neutral pose again.
- Click add keyframe to save the pose.
At this stage you should have a basic animation with linear interpolation. The robot starts in a generic pose, raises it's arms in a welcoming pose, holds for half a second and then returns to a generic pose. If you find the timing is a little floaty (slow). Use the slice & weld tools to chop between the keys to experiment with timing. Keep in mind the robot can only move to the positions you set at its own top speed. If your timing is too fast, the robot wont register the pose. Now would be a good time to save the file, as you build up the level of detail.
2nd Animation Pass
Now we will add some little details to various body parts to make the movement a little more interesting. This stage can be repeated on a per body part basis.
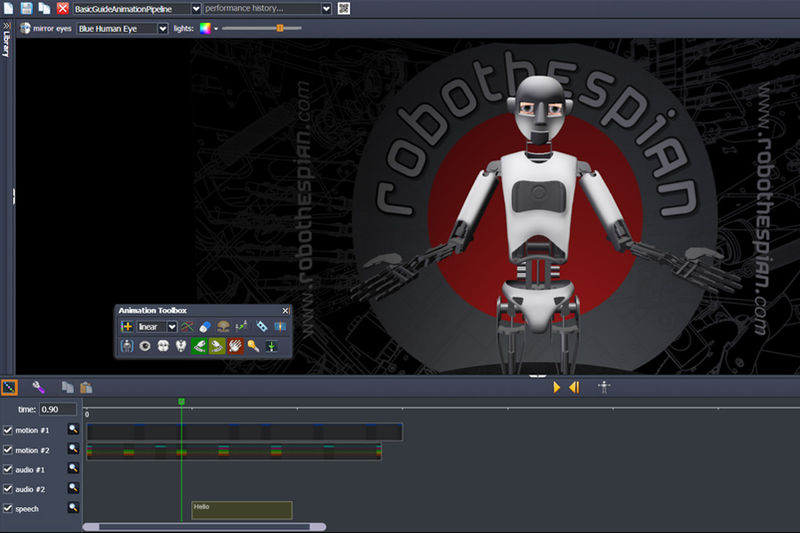
Let's make the robot to look down at the start and end, but be looking forward at the welcome pose. To make this change...
- Toggle off all the body parts except the head.
- Move the timeline marker to the first key pose at 0.0 seconds.
- Pose the head to look down.
- Click add keyframe to save the pose.
- Move the timeline marker to the two Welcome poses.
- Pose head and key in a forward looking pose for each one. (Doesn't matter if they aren't exactly the same position)
- Move the timeline marker to the last generic pose.
- Pose the head looking down and key it.
Now you should see your changes reflected on playback. You have updated the animation with new head poses.
You can toggle on individual body parts and key them how you like, where you like to create unique movement.
Let's do that now. Maybe we want the head to look up with a delay and then look down with a delay.
- Keep just the head body part filter toggled on
- Move the timeline marker to the halfway point between the first and welcome poses.
- Pose the head so its still looking down, same as the first pose and add a keyframe.
- Now move the timeline marker to halfway between the last welcome pose and the last generic pose.
- Pose the head back up, so it's looking forward and add a keyframe once again.
When you play this back, you should see the head delays in looking up at the start and then delays in looking down at the end. What we have just done is the key to creating more detailed animation. A technique you can build on as you become more familiar using VR. Doing the same to individual body parts, such as the arms will bring more life and realism to your performance.
3rd Animation Pass
Now we have a finished simple body animation, all that remains to animate is the eyes. I recommend animating these on a different motion track. So go ahead and disable/toggle the motion track that contains the body animation, we just created.
- Toggle only the eyes body part filter in the toolbox
- Start this pass by creating eye poses to match each body pose in your animation.
- This is done easily, because they are mirrored by default.
- For more custom eye positions, turn off the mirror eyes toggle button.
- Position the eyes and key them how you like.
- To review, toggle on the body animation to see how it looks. Then toggle off again to continue editing the eyes.
- You can create blinks, eyes movements, whatever you think looks best to suit your performance.
- Now save the file.
As a finishing touch, you may also wish to use the slice and weld tools to cut between key frames and adjust the timing by moving them. This can be quite fun, to observe how differences in timing affect the performance.
That's it. You have created a simple VR performance from scratch, using the toolbox and some basic animation techniques.
Practice this technique to create some more animations and then progress to the Advanced Guide to the Animation Pipeline to learn some advanced techniques.
New UI Features
As VR evolves we will be updating and changing the UI. New features such as Move Keys, Move Frames and Undo have been added recently. These features do not affect the animation process described above, but do offer a more efficient workflow.
Please see What's New for more information.