Touchscreen
Contents
Introduction
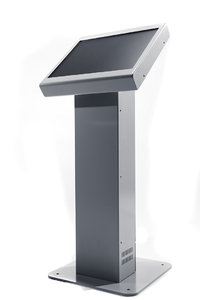
This simple intuitive interface allows for easy interaction with a robot, after start up it will appear automatically on the kiosk touch screen (if supplied with your robot), or you can access a browser based version remotely see here.
Watch the YouTube video above for a quick introduction (click on the image in the top right corner or click here to view.)
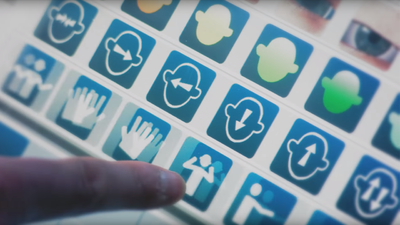
The touch screen interface is designed for casual users and requires no training, it is commonly used by visitors in science centres and museums or for interaction at trade shows and conferences etc.
The touch screen interface is customised to suit the robot being used and will be different for RoboThespian and SociBot.
For a list of what content is pre-installed on the interface see Standard Content
You can also fully customise all the features and content shown on the touch screen - see Content Creation.
The interface is divided into a public access area (screens and features available to your visitors / customers) and a password protected admin area (controls for volume, shut down, troubleshooting and other administrative features)
Note: All the following screens can be hidden if desired. You have control over what users will see.
The following screens are usually enabled by default:
Quick Reference Guide

Language

The language page is the landing page, the page the shows on robot start up, allowing you to select from the interface translations pre-installed on your robot.
Note that you may only have one language installed or enabled, in which case there will only be one button.
Additional Languages
New Languages can be added as needed
If the flag icon is not yet available a two letter code will appear on a grey button as with CZ, (Czech Republic) in the image. Additional flags can be created if required.
Buttons (also known as Tricks - OPTIONAL)

Quickly direct your users to the most important/relevant content using large, colourful buttons.
These can be used to play sequences or start control functions. Buttons can trigger a story, or a song, start SHORE age-gender-mood estimation, or play user created sequences from the Compose screen.
A 'stop' button halts any of the behaviours or sequences on this page.
Library

The library screen allows for easy triggering of sequences and animations that are stored on the robot.
Simply press a button to trigger the desired animation. The arrow keys at the bottom of the screen move through further pages of animations.
RoboThespian and SociBot come pre-installed with a range of content, composed of iconic film impressions and songs, related to robots and broader themes. You can get a recent list of content here - Standard Content
Custom content can be created by Engineered Arts, developed in conjunction with customers, to cover any subject desired.
You can also create and edit sequences yourself - see Content Creation for information on how to do this.
Compose


The compose screen is used to quickly and simply generate new sequences.
Eye graphics, cheek colours, head movements and poses can be overlayed onto speech and audio effects to create a complete sequence. Sequences are saved as you go along and remain accessible until deleted.
RoboThespian:
- Audio, eye graphics, cheek colour, head movement and pose selections
- Timeline – drag selections here and rearrange as desired
- Start and Stop controls to play sequence on RoboThespian
- Timeline scrollbar – drag slider or press left and right arrows to scroll through sequence
- Sequence selector, currently 10 sequences can be created - this can be expanded. Press on any of the numbers to select the sequence to work on. Sequences should be saved when your robot is shut down. NB please follow the shutdown procedure for RoboThespian - RoboThespian Shut Down / SociBot Shut Down
- Text-to-Speech Editor – click to create new speech or drag user created speech here to edit
- Bin – drag animations or audio here to remove them from the sequence. You can also drag any of the numbered buttons on the right (sequence selector) into the bin to delete the entire sequence.
SociBot:
As per RoboThespian, but
- poses are removed (no body to pose)
- guises (faces) are added
Adding audio

Existing audio and sound effects can be dragged with a finger to the time line in the bottom half of the screen or you can create your own speech using the text-to-speech engine.
To see more selections, click on a button and sweep your finger to scroll through the available options.
Adding your own speech

You can create your own speech by clicking on the Create button, this opens an onscreen keyboard and text editor.
The Text to Speech engine can be pre-configured with a range of voices. To change the voice and language in use, click on the appropriate flag.
Type the desired text, test it with the play button, then hit the add button to add to your sequence. Should you later wish to edit your text, drag the text onto the Create / Edit box on the right.

Adding animations

Eye graphics, cheek colours, head movements and poses can be overlayed onto the audio. Drag the desired selection onto the timeline to build your sequence.
Use the play and stop buttons to play the sequence on RoboThespian. Moving the scroll bar next to the play and stop buttons scrolls through the timeline.
Animation tips


These are visually effective compose moves.
Try and incorporate regular blinks, move the eyes around to look at your audience.
For example, blink, then look left with the eyes, turn the head slightly later to the left, make the eyes look straight again, look right with the eyes, then turn the head to the right, look straight with the eyes. Look forward again.
Try looping these gestures for expressive movement:
General animation tips
- Use sharp specific gestures
- Listen to the script / audio
- Think: where should key gestures be
- Less is more - think how people gesture when they present information - they don't wave arms around all the time
- Then fill in gaps if not moving enough - small / slow smooth movements
Live


The live screen allows for live control of the robot. You can make the robot look in any direction, by touching the screen section showing the view from its head webcam. You can also get the robot to say different greetings, farewells, questions, responses, and even make noises; move the head in pre-defined sequences, or change facial expressions or eye positions.
Clockwise from upper left
- Pupil control - move pupils to point where you like
- Eyelid control - blink, wink, shut eyes, open eyes
- Novelty pupils - replace SociBot's irises with a dollar sign, heart, spiral, or back to the default (blue eyes)
- Cheek colours - select colour and brightness/intensity from the colour picker and brightness slider
- Head tilt slider - press on the slider and drag to tilt the head sideways
- Audio / speech controls - press on desired text or the speaker button next to the text to make SociBot speak or make sounds
- Audio / speech bank selector - use to select different categories of audio for SociBot - there are several menus
- Mood selection - choose from several default expressions: happy, sad or surprised
- Head movements - move left, right, up, down, shake and tilt the head
- Quick face selection - black woman, white woman, bearded man, Queen, Ziggy Stardust, skull
- Live video feed - from the head mounted camera. Use this to control the robot's head and gaze direction manually.
Auto (also knows as Sensors)

The auto screen (also known as Sensors) displays camera feeds from the chest-mounded RGB and depth sensor, and head camera with relevant overlays
At the top of the screen there are two views:
- The left view shows the image from the head camera
- The right view shows the image from the optional infra red camera, used to help calculate depth or distance to objects in its field of view
Please note that the simplified Sensors screen replaces the previous kinect screen with Brainiac which is no longer available
Administrative Screens
If you have administrative access to the robot, you can use the admin touch-screens to debug, control and even manage the content on the robot. The touchscreen CMS has been superseded by the browser-based CMS, however older SociBot models may still have this functionality.
See Kiosk Admin for a detailed guide.
Accessing the touchscreen interface without a kiosk or network connection
You may want to use your RoboThespian without the Touchscreen Kiosk, but want the benefits of the quick and simple interface.
If you have no network or internet connection this can be achieved using a pre-configured router. See Touchscreen Interface without a kiosk