Virtual Robot Tips & Tricks for Creating Performances
Virtual Robot > Tips & Tricks for Creating Performances
Contents
Tips and Tricks for Creating Performances
Audio
Recorded speech is the most natural sounding method of generating a compelling performance, but allows you little editing flexibility. The Acapela TTS engine used by RoboThespian is a strong substitute which with some care and attention can be almost as versatile. Using a natural sounding voice without much speed or shaping distortion will assist in making your performance believable. Experimenting with different spellings and punctuation can help smooth out intonation and timing. As with most animation methods, time spent on small details will have disproportionately rewarding results.
Here are some useful guides and links to help you get the most out if using TTS voices.
- Vocal Smileys - recorded sound effects like coughs, and words with different recordings when followed with an exclamation mark
- For example: entering #cough# or #laugh# will generate the appropriate sound
- The use of vocal smileys only works with certain voices (list on the link above).
- Voice Tuning - varying speed, pitch, shape (age of voice), spelling out words, and other features
Note when using TTS from a Control Function or other python script, and using Voice Tuning tags, use either of the following methods so that \ followed by a letter is not parsed as a special character.
- e.g. in
self.robot.say('\rspd=50\ this is half speed')the\rgets parsed as a special character.- Use
rbefore the speech and tag e.g.self.robot.say(r'\rspd=50\ this is half speed')instead. - Or use double backslashes (
\\) around the voice tag e.gself.robot.say('\\rspd=50\\ this is half speed')instead.
- Use
Voice Overs and Reference Video
- When recording VO, make sure you leave enough time between sentences or write in pauses, if there is an important gesture or action to follow.
- Recording VO in clips (sentences or small paragraphs) allows for better control of delivery timing. Clips can be spaced in VR.
- If creating a video for reference with specific gestures/actions make sure you leave enough time for those to play out.
- Keep in mind that RT cannot move quite as fast as a human actor. A head nod or body lean must be allowed enough time to play out.
Animation
Planning
- Carefully plan out what you intend to do with the robot. Time spent planning will save hours when it is time to animate.
- Write a script, draw a thumbnail sheet or storyboard. Detailing how Robothespian should act and move for each piece of dialogue.
- Pick out and underline operative words in each piece of dialogue from your script. This will help you make better acting choices.
- Think about creating strong poses with the robots body. Consider opposites, silhouettes and negative space around the body and how the pose or gesture reads from a distance.
- Act out the script and become familiar with how it should be delivered. Video yourself so you have reference to review if needed.
Animating
There are two common methods for how 3D animation is created. The first is called 'Straight Ahead' where the animator will not plan too much, and animate the finished details as they go. This method can produce good results, but can be frustrating if changes are required later in production.
The other method is often called 'Pose to Pose' and involves building up your animation with careful planning, adding layers or passes of detail as you go.
The method which we would recommend and seems to work best with the Virtual Robot tools is the Pose to Pose method.
Keep in mind the frame rate for the Virtual Robothespian is 20 frames per second. The timeline is divided in 1/20th of second increments.
There are no rules to how you might go about animating. Everyone likes to animate differently.
Below is a list of guidelines to keep in mind when starting a project.
- Plan to animate by building up your work in passes. A finished animation sequence takes time to create and can become complex if you don't have a logical approach.
- Start by organizing your audio and sign off on it. Doing this will minimize changes down the road and save time.
- Become familiar with Key Poses, Breakdowns and Inbetweens. These are animation terms which describe different types of keys.
- Consider making use of the stepped,linear and spline features. These can make all the difference when working out movements.
- First pass - Key all the key poses. These are the strongest most important poses which define actions and gestures.
- Move key poses around to get the desired timing. At this stage you should be able to see which poses are working well.
- Second pass - Add breakdown poses. These are crucial to creating interesting movements and better timing.
- Third pass - Add inbetween poses. These refine the movements in between the key poses and breakdowns.
- When animating at 10 frames per second, you may find there is not enough room for breakdowns and inbetweens in the traditional sense.
- Consider Robothespian's real world physical limitations, such as head and torso movement speeds and keeping the arms in safe positions.
- The real life robot can only move at a certain speed which could be slower than the timing you have specified in placing your key poses.
- Leave eye darts (rapid eye movements) and blinks to the very last. Doing so will keep you animation easier to manage until you are happy with the body movement.
- Create nice arcs with the arms and head. Breakdown and inbetween poses help define smoother more natural movement arcs.
- Try not to twin movements. Twinning is a term used in animation where body parts tend to mirror one another and are synchronized. Your key pose can be a mirror, just try to make the movement to the pose asynchronous. Even the slightest delay will help make the movement nicer if everything has some offset. This is currently hard to achieve with the current VR tools.
- Use moving holds. When people move they don't gesture and hold still, they keep moving. Subtle movement in and out of gesture poses helps sell the performance.
- KISS "Keep it simple, stupid' is a valuable acronym to keep in mind. Clear poses and simple movements between them will work best on Robothespian.
If things are not working and you are spending too much time being frustrated whilst animating. Maybe its time to take a step back. Don't be afraid to go back to the drawing board and start over. Its always better to spend time planning what you intend to do. The end result will always be better and often get produced faster with a solid plan in place.
Things to avoid
- Don't give the Robothespian a case of 'RandomBlinkitus'. Too many blinks, which are not timed to any particular gesture, movement or piece of dialogue will make the performance weaker
- Don't make Robothespian move constantly or thrash about. It looks strange, doesn't engage people and will potential cause a mechanical wear and tear.
- Don't make Robothespian gesture too much with each piece of dialogue.
- Keep in mind that RT cannot touch his own face or body.
- Try not to position the arms above the head, whilst twisted back. This will potentially cause the arm to flip backwards and suddenly forwards again.
Performance Organisation
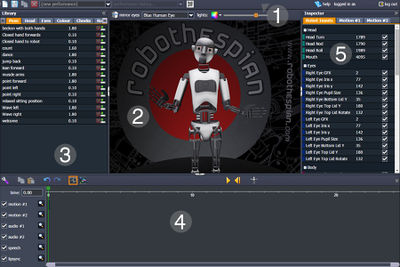
When animating a performance from scratch, its good practice to keep your timeline as clean and simple as possible. This will make future editing and late changes easy to accommodate. Currently the best method for organising your projects in VR, is to use both motion tracks. Keeping all the body keys on one track and the eye and lighting keys on the other. Separating the eye and lighting keys from the body keys, allows you to concentrate on the body first. Using this method should produce faster results, by leaving the small details to last. The eyes are the most time consuming and important part of animating RT. They are dependent on head and body position, which is why its important to animate the body first.
Scaling Movements
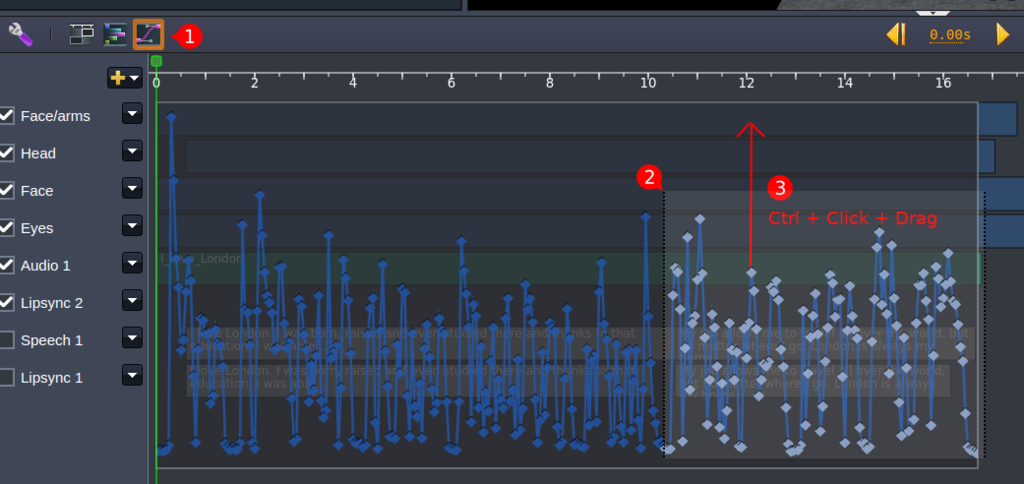
Some movements, especially those auto-generated like lipsync, can come out consistently too reserved or small. By using the curves editing mode, it is easy to scale up whole sections of animation.
Enter curves editing mode.
Select the keyframes you want to change.
Ctrl + Click + Drag on the frame you want to move the most, the furthest frame (in this case the lowest) will stay still, and the frames will scale evenly with your mouse movements.
Further Resources
These are links to external resources.
Please note content on external resources is outside the control of Engineered Arts and may have been changed, modified, removed since posting the link here.