Virtual Robot - Projected Face Animation Process
Virtual Robot > Projected Face Animation Process - Including Socibot
Contents
Introduction
The following page describes the current best practices and complete workflow for creating a face animation using the Projector Face version of VR.
The animation & editing process remains the same as the regular version of VR. The UI is identical to the regular VR with new features for animating the projected face. The following process is likely to evolve as we improve the software and refine features.
The Process
The layout below shows a finished file created using the following steps.
- Set up a file - Preparing a Sequence
- Chose a Guise for Performance - Select & Key Guise
- Add audio - Placing Audio
- Add tts items, sync up as you go until entire track is how you want it - Placing Audio
- Delete tts items if using pre-recorded audio. TTS track can also be disabled if you want to keep items as you work on file, but this will stop new items being added.
- Edit lipsync items if required, adding length or exaggeration as needed - Editing Lipsync
- Animate body, arms and head as needed. Keep animation on one motion track.
- Animate expressions with rest of face (brows,cheeks,eyelids,eyes) on the other motion track - Animating The Face
- Refine/Fix/Smooth anything which looks out of place - Finish Up

Preparing a Sequence
Create a new sequence or open an existing performance from your account. If opening an existing sequence it would be a good idea to create a copy, rename it and edit from there. Also removing existing Robothespian jaw and eye animation which wont work with the projected face.
If starting from scratch, it's a good idea to import the audio you are going to use first. You can use TTS (text to speech) as a voice or import an audio file if using a pre-recorded voice. Then the tts itself can be used for the voice or it can be removed (using select & delete) later leaving only the generated lipsync data and the audio track you wish to used instead of tts. Creating tts items which generate lypsync data is currently a faster method of creating the required phonemes for a performance.
Select and Key Guise
It's important to note that as the guise is an input of the face section in the inspector, everytime you add a keyframe with the guise input on it will save that guise at that keyframe. So if you have multiple keyframes with the same saved guise in the timeline and you wanted to change that guise; you would have to go through every keyframe and save a new keyframe with the new guise. This can be a bit time consuming, especially if you have a large performance or want to do the same performance with multiple different guises. A good solution would be to only save the current guise at the start of the performance with an initial first keyframe. Once you've done this make sure with every other keyframe that the guise input in the inspector is turned off (greyed out). Now if you wish to change the guise, all you need to do is change that first initial keyframe.
So as a good practice, it may be a good idea to get your guise (and potentially the eyes too) chosen and in the timeline first before animating anything else to do with the face.

You can also key the eyes in the same way, only turning on the eye input and keying it on the first frame. Remember to uncheck that input when keying the eye animation.

Placing Audio
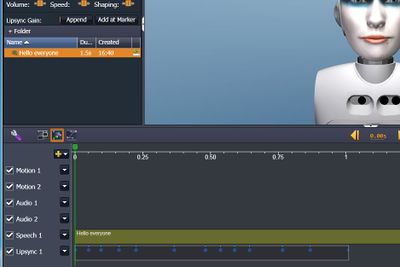
Audio File Placed with TTS to Generate Lipsync. Notice the new Projector Face Features in the UI. The guise and eye drop down selectors at the top of the 3D viewport. The Face Item selection button in the Toolbox and the projector face itself in the 3D viewport replacing the regular Robothespian head.

TTS Clips arranged to match pre-recorded audio track. They can be dragged to sync up and the items themselves can be edited. Once sync'd the tts can be deleted leaving the lipsync data item in place to be edited further if required.

The trick to creating the best lipsync automatically is to use short tts items (1-3 words) whilst experimenting to get the best mouth shapes (phonemes) to match your audio. Again if using tts for the voice this is less of a concern as the lipsync data matches closer than it would another voice. If using a pre-recorded voice a good tip to help identify the two voices is to pick a tts voice which sounds different to the voice in the audio track. This helps with identifying each voice on playback when moving tts items to sync in time correctly.

The Lipsync Gain shown above is a new feature in the Library Speech Tab which affects how much the mouth opens for a tts item. Experiment with different values to get the results you require for your performance. Increasing the Gain works well when singing or shouting is required. Existing tts items in the dragged in from the Speech Library will have a default Gain value unless they were created with a custom value.
Editing Lipsync
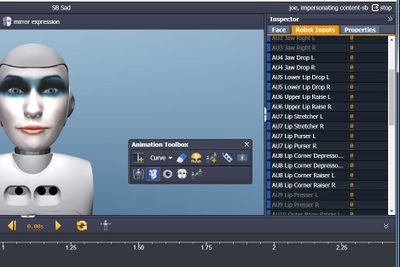
The current lipsync editing process can be a little tricky and is only required if you are trying to match pre recorded audio. If using tts for the voice the sync and mouth shapes should be good enough. You have to first understand the mouth shapes created by the lipsync data are using some the same face controls used to make general expressions. So for the time being we must be careful which inputs are selected when keying/editing lipsync keys and face keys. The image here shows a lipsync item being viewed in keyframe edit mode. This can easily be toggled on by simply double clicking the lipsync data item. This highlights the keys and switches the mode to keyframe edit mode. The specific key frames will then highlight blue. They can be moved, deleted, copied and pasted. You can also key new ones by making sure only the shown inputs are selected in the inspector window. Also make sure no other body part selections are made in the toolbox when editing lipsync.
The following inputs must be checked. They will be automatically checked if you double click a blue key frame. To view these inputs, open the right hand inspector panel and click select the Robot Inputs Tab. Scroll down to find them.
- AU4 Jaw Drop Left
- AU4 Jaw Drop Right
- AU5 Lower Lip Drop L
- AU5 Lower lip Drop R
- AU6 Upper Lip Raise L
- AU6 Upper Lip Raise R
- AU7 Lip Stretcher L
- AU7 Lip Stretcher R
- AU7 Lip Purser L
- AU7 Lip Purser R
- AU8 Lip Corner Depresser L
- AU8 Lip Corner Depresser R
- AU8 Lip Corner Raiser L
- AU8 Lip Corner Raiser R


Once familiar with the above you will find simple edits work best. Also look at the corresponding Face Tab in the inspector. These controls match the inputs listed in the Robot Inputs tab. I find making minor edits to controls enough to get a convincing performance. I tend to only edit the AU4 Jaw Drop (exaggerating the opening where needed, AU6 Upper Lip (reducing how much upper teeth are shown), and AU7&AU8 if needed. I also drag existing keys where needed to help match pre-recorded audio by keeping the mouth open longer or closing it sooner.
It may take several attempts at going through this process before you get a handle on how to get the best results. Keeping it simple is usually the best approach!
Make sure to test the lipsync on the real projected face before doing any further animation. At this stage it's important to get the lipsync right before adding more detail and possibly hours of work. The dialogue drives the performance, so make sure everything is just how you want it.
Animating The Face
Animating the face should be done using a controlled process adding details slowly in passes. The first thing I do is animate the eyes (pupils). As they would dictate what happening with the expressions and focus of gaze. So make sure the lipsync inputs are unchecked and select the eyes in toolbox. Now start keying the eyes on a separate motion track from the body/head/arms animation. So will end up with one track which holds eyes and face animation when done. The eye work well when movements happen quickly, if using an in between for the eye between two positions, make the eye go somewhere on it's journey rather than follow a linear path to it's destination. this makes movements more interesting. For example: A look up from looking forward could travel via a slight swing to the right or left for one key in between the start and end positions.
Once the eye is keyed for the entire timeline, you can start to fill in the main expressions. Spend some time studying video of yourself or an actor you like, observing when they move their eyes in relation to when expressions change and how quickly they do so.

When you have an idea how the performance will go, follow this process for keying expressions. This is important so we don't add any data which causes a conflict with the lipsync. We must not key any inputs which the lipsync uses on it's track.
- Select the Face Input in the toolbox, making sure no other inputs are selected.
- Open up the Robot Inputs Tab in Inspector
- Scroll down to find the AU4,AU6,AU7,AU8 inputs. Make sure they are all unchecked (these are used for lipsync and must NOT be keyed for the face keys)
- Go to the Face Tab in Inspector
- Use Any Sliders (except AU4,AU6,AU7,AU8) to create expressions.
- Keying the expression changes to happen over two to four keys works well. You can reduce the intensity over time to ease out of an expression, rather than holding it.
- If you double click a face key in timeline/motion track it selects inputs so it's good practice to quickly check the inputs to make sure the AU4,AU6,AU7,AU8 inputs remain unchecked.
Once you happy with the expressions and transitions you can do a final pass keying the blinks. This pass is left until last because it adds lots of keys and the timeline can become difficult to work with. So my process involves making a backup file (copy) at this stage. Keeping my file without blinks. The copy can then be renamed and blinks added as follows.
- Uncheck all inputs in Toolbox.
- Go to Robot Inputs in Inspector, turn on AU13,AU14,AU15 inputs only.
- Go to Face Tab in Inspector, Use sliders for AU13,AU14,AU15 to control the eyelids.
- Make a pass through the timeline keying where needed.
- Notice how many keys this creates, often adding to existing keys.
Finish Up
Once you have the performed all the steps above you should have a good understanding of how to create a basic projector face performance. The best process is to carefully build up the detail as you go in passes as described. Make sure to save your working file periodically and make backups (copies) at certain stages so you can always go back and restart if things don't go to plan.