Difference between revisions of "Virtual Robot Content Organizer"
(→Icon selection) |
|||
| (25 intermediate revisions by the same user not shown) | |||
| Line 4: | Line 4: | ||
{{headerthumb|File:VRScreen_layout.jpg|The Virtual Robot Interface|link=http://virtual.robothespian.co.uk}} | {{headerthumb|File:VRScreen_layout.jpg|The Virtual Robot Interface|link=http://virtual.robothespian.co.uk}} | ||
==Introduction== | ==Introduction== | ||
| − | [[Virtual Robot]] provides a simple to use web based tool for [[Content Creation|content creation]] on [https://www.engineeredarts.co.uk | + | [[Virtual Robot]] provides a simple to use but powerful web based tool for [[Content Creation|content creation]] on [https://www.engineeredarts.co.uk Engineered Arts] robots like [[RoboThespian]] and [[SociBot]]. |
| − | + | The Content Organizer is used to arrange [[Touchscreen|touch screen]] and [[Telepresence]] content, add button images and text labels; transfer new performances and synchronise updates to performances with your robot, even while the robot is switched off. | |
| − | ==Accessing Content Organizer== | + | ==Accessing the Content Organizer== |
| − | + | The content organizer can be accessed from the [[Remote_Connection#Remote_access_via_the_Robot_Management_System|Robot Management System]]: | |
[[File:content1.jpg|thumb|none|1024px|link=|Robot Management System]] | [[File:content1.jpg|thumb|none|1024px|link=|Robot Management System]] | ||
| Line 16: | Line 16: | ||
{{num|1}} Serial number of robot - when robot is ONLINE this becomes a link. Click the link to open the robot's [[Tritium GUI]]<br> | {{num|1}} Serial number of robot - when robot is ONLINE this becomes a link. Click the link to open the robot's [[Tritium GUI]]<br> | ||
{{num|2}} Status of robot - ONLINE / OFFLINE<br> | {{num|2}} Status of robot - ONLINE / OFFLINE<br> | ||
| − | {{num|3}} ''''' | + | {{num|3}} '''''Link to robot's content - click to open [[Virtual Robot Content Organizer]]'''''<br> |
{{num|4}} Tinman status - when robot has telepresence installed and is ONLINE, click here to access the [[Telepresence|Tinman Telepresence System]] | {{num|4}} Tinman status - when robot has telepresence installed and is ONLINE, click here to access the [[Telepresence|Tinman Telepresence System]] | ||
==Content Organizer Overview== | ==Content Organizer Overview== | ||
| − | Content | + | Virtual Robot Content Organizer is composed of 4 sections: |
[[File:content2.jpg|thumb|none|1024px|link=|Content Organizer]] | [[File:content2.jpg|thumb|none|1024px|link=|Content Organizer]] | ||
| − | {{num|1}} Files: performances in your Virtual Robot account<br> | + | {{num|1}} Files panel: performances in your '''Virtual Robot''' account<br> |
| − | {{num|2}} | + | {{num|2}} Robots panel: performances already on your '''robot''' or ready to sync to your robot<br> |
| − | {{num|3}} Properties: edit the [[#Properties|Properties]] of performances and manage their appearance on the <br> | + | {{num|3}} Properties panel (hidden by default): edit the [[#Properties|Properties]] of performances and manage their appearance on the <br> |
| − | {{num|4}} File transfers and log: | + | {{num|4}} File transfers and log: status of transfers |
| − | ===Files: Performances in Virtual Robot | + | ===Files panel: Performances in Virtual Robot=== |
[[File:content3.jpg|thumb|none|600px|link=|Files]] | [[File:content3.jpg|thumb|none|600px|link=|Files]] | ||
{{num|1}} Edit: open selected performance in Virtual Robot for editing. You can also double click a performance to edit it.<br> | {{num|1}} Edit: open selected performance in Virtual Robot for editing. You can also double click a performance to edit it.<br> | ||
{{num|2}} Delete: delete selected performance from Virtual Robot permanently<br> | {{num|2}} Delete: delete selected performance from Virtual Robot permanently<br> | ||
| − | {{num|3}} Transfer: transfers performance to the robot archive | + | {{num|3}} Transfer: transfers performance to the robot archive folder (rather than directly to the Touch screen or Telepresence interface)<br> |
| − | {{num|4}} Bulk Edit: edit properties of multiple performances | + | {{num|4}} Bulk Edit: easily edit properties of multiple performances<br> |
| − | {{num|5}} Duplicate: duplicate the selected folder<br> | + | {{num|5}} Duplicate: duplicate the selected folder and its performances. Duplicates are unique copies that can be edited without affecting the originals.<br> |
| − | {{num|6}} New Folder: create folders to organise content<br> | + | {{num|6}} New Folder: create folders to organise content.<br> |
| − | + | {{num|7}} Performances are listed below, clicking on Name to sort by name<br> | |
| − | + | {{num|8}} Last Saved: date or time (if today) performance was last saved. Click on Last Saved to sort by Last Saved. | |
| − | {{num|7}} Performances are listed | ||
| − | {{num|8}} Last Saved: date or time (if today) performance was last saved | ||
| − | === | + | ===Robots panel: performances already on your robot or ready to sync to robot=== |
[[File:content4.jpg|thumb|none|600px|link=|Robots]] | [[File:content4.jpg|thumb|none|600px|link=|Robots]] | ||
{{num|1}} Edit: open selected performance in Virtual Robot for editing. You can also double click a performance to edit it.<br> | {{num|1}} Edit: open selected performance in Virtual Robot for editing. You can also double click a performance to edit it.<br> | ||
| − | {{num|2}} Delete: delete selected performance from robot. Performance still | + | {{num|2}} Delete: delete selected performance from robot. Performance still exists in Virtual robot until deleted from Virtual Robot.<br> |
| − | {{num|3}} Sync: | + | {{num|3}} Sync: sync new or altered performances from Virtual Robot to the robot<br> |
| − | + | {{num|4}}, {{num|5}} User's robots. Click the arrow next to a robot to show all the subfolders containing content on the robot. <br> | |
| − | + | Clicking the arrow again hides the subfolders. You can also double click on the Robot to expand / hide subfolders<br> | |
| − | |||
| + | ===File Transfers and Log=== | ||
| + | Shows status of current sync requests. Clicking on a robot to sync content to and pressing the Sync button adds a "pending" sync job to the File Transfers list. | ||
| − | [[File: | + | [[File:content6.jpg|thumb|none|600px|link=|Sync request pending]] |
| + | {{num|1}} cancel: cancel selected sync job<br> | ||
| + | {{num|1}} clear completed: remove completed sync jobs from the list<br> | ||
| + | {{num|2}} Status: pending / completed<br> | ||
| + | {{num|3}} Last Activity: date and time sync job was added if pending, or date and time completed<br> | ||
| + | {{num|4}} File: performance or folder being synced<br> | ||
| + | {{num|5}} Robot: Name (or location) of robot | ||
| − | |||
| − | |||
| − | |||
| − | |||
| − | |||
| − | |||
| − | |||
| − | |||
| + | Once the robot is online it will begin to synchronise. When the content has been transferred to the robot the Status will show as "completed". | ||
| − | [[File:content7.jpg|thumb|none|600px|link=| | + | [[File:content7.jpg|thumb|none|600px|link=|Sync job completed]] |
| − | + | {{num|1}} Status: completed transfer of performance or folder<br> | |
| − | + | {{num|2}} clear completed: remove completed sync jobs from the list | |
| − | + | Log: logs actions carried out in Virtual Robot Content Organizer | |
[[File:content8.jpg|thumb|none|600px|link=|Transfer Log]] | [[File:content8.jpg|thumb|none|600px|link=|Transfer Log]] | ||
| − | |||
| − | + | ===Transferring content to Touch Screen kiosk - LIBRARY page=== | |
| + | Example LIBRARY page showing on the [[Touchscreen|touch screen]]: | ||
| − | [[File: | + | [[File:RoboThespian At a Glance User Interface Library.jpg |thumb|none|600px|link=|Example LIBRARY page]] |
| − | |||
| − | |||
| − | |||
| − | |||
| − | |||
| − | [[ | + | In the [[#Robots panel: performances already on your robot or ready to sync to robot|Robots panel]] select the Robot you wish to transfer performances to. |
| − | |||
| − | |||
| − | |||
| − | + | [[File:content9.jpg|thumb|none|600px|link=|library folder]] | |
| − | + | {{num|1}} Click the arrow next to the Robot you wish to sync content to. This shows all the subfolders containing content on the robot. (Clicking the arrow again hides the subfolders. You can also double click on the Robot to expand / hide subfolders)<br> | |
| − | [[File: | + | {{num|2}} Click the arrow next to 'touchscreen_ui' to show the subfolders for content in different languages on the Robot<br> |
| − | + | {{num|3}} Click the arrow next to 'en_GB' (for British English touch screen content) - if you have other languages installed they will appear here as well. This folder this contains all editable pages of the touch screen interface<br> | |
| − | + | {{num|4}} Click the arrow next to 'Library' to show the Library content in the order it appears on the touch screen kiosk | |
| − | |||
| − | |||
| − | |||
| − | |||
| − | |||
| − | + | ====Let's say you want to add a new performance to the LIBRARY page.==== | |
| − | |||
| − | [[ | + | Select the performance you want to add in the [[#Files panel: Performances in Virtual Robot|Files panel]] on the left and drag it into the Library folder of the Robots panel on the right. |
| − | |||
| − | |||
| − | |||
| − | |||
| − | |||
| − | |||
| − | |||
| − | |||
| − | |||
| − | + | [[File:content10.jpg|thumb|none|600px|link=|Transfer to library]] | |
| + | Drag selected performance {{num|1}} from Files panel into the Library folder {{num|3}}.<br> | ||
| + | A dialog box {{num|2}} indicates how many performances are being dragged<br> | ||
| + | {{num|3}} Green dotted line indicates which folder performance or folder is being dragged to | ||
| − | + | * Add any other new performances in the same way. | |
| − | + | * Change order of performances in the Library folder by dragging performances around | |
| + | * Delete any performances in Library if no longer wanted. | ||
| − | + | Then sync the changes to the robot | |
| − | |||
| − | |||
| − | |||
| − | |||
| − | + | ===Syncing content changes to robot=== | |
| + | [[File:content11.jpg|thumb|none|600px|link=|Ready to sync - items that will be synced marked]] | ||
| + | {{num|1}} Transferred performance in library from example above<br> | ||
| + | {{num|2}} Sync symbol indicates items that will be synced (i.e. updated or transferred or re-ordered)<br> | ||
| + | {{num|3}} Click Sync to add the sync job to the [[#File Transfers and Log|File Transfers list]] and initiate the changes<br> | ||
| + | Once the robot is online it will begin to synchronise. When the content has been transferred to the robot the Status will show as "completed". | ||
| − | |||
| − | + | [[File:content7.jpg|thumb|none|600px|link=|Sync job completed]] | |
| − | |||
| − | + | To see the updated content on your touch screen, change to one of the other pages on your touch screen (e.g. LIVE or LANGUAGE) then click on LIBRARY again to reload the LIBRARY page - you should now see all your changes. | |
| − | + | ==Properties== | |
| − | + | Access the properties panel by clicking on the ">>" : | |
| − | + | [[File:content12.jpg|thumb|none|1024px|link=|accessing properties]] | |
| − | |||
| − | + | This opens the Properties panel | |
| − | + | [[File:content13.jpg|thumb|none|1024px|link=|Properties panel open]] | |
| − | |||
| − | |||
| − | + | Select a sequence in Files that you wish to change the properties of. The following properties are availabnle | |
| − | + | [[File:content14.jpg|thumb|none|600px|link=|Properties elements]] | |
| − | < | + | {{num|1}} ID: unique ID number (For info - can not be altered)<br> |
| + | {{num|2}} Name: Sequence name<br> | ||
| + | {{num|3}} Label: Button label that appears on the Touch Screen interface<br> | ||
| + | {{num|4}} Description: Use to describe your content if desired (does not appear on touch screen)<br> | ||
| + | {{num|5}} Icon: Select an icon to use on the Button on the Touch Screen or in the Telepresence interface<br> | ||
| + | {{num|6}} Limit Control: Limit the sequence in [[Tritium Arbitration]] to only control certain parts of the robot (no need to change if unfamiliar with Arbitration)<br> | ||
| + | {{num|7}} Exclusive: Arbitration related, no need to change if unfamiliar with Arbitration<br> | ||
| + | {{num|8}} Loop: For Telepresence loops - sequences that will loop until told to stop<br> | ||
| + | {{num|9}} Robot Model: For info - robot model the sequence was created for.<br> | ||
| − | Click | + | ===Icon selection=== |
| + | [[File:content15.jpg|thumb|none|600px|link=|icon selection box]] | ||
| + | Click in the empty box {{num|2}} next to Icon {{num|1}} this will open Icons window<br> | ||
| + | Here you can select an existing icon e.g. humphrey {{num|3}}, or scroll to the bottom of the icons and click "+ Upload" to upload your own. | ||
| − | |||
| − | |||
| − | |||
| − | + | The icon property will update to the selected icon: | |
| + | [[File:content16.jpg|thumb|none|600px|link=|changing performance icons]] | ||
| − | |||
| − | After the | + | After making any changes in properties hit sync again to sync the changes to the robot. |
| − | < | + | Clicking the "<<" symbol closes the properties panel |
| − | |||
| − | |||
| − | == | + | ==Some useful shortcuts== |
| − | + | * slow click folder or performance name to rename | |
| − | + | * double click folder to open | |
| − | + | * double click performance to edit | |
| + | * click an arrow next to a folder to show / hide subfolders | ||
| + | * double click on a folder to show / hide subfolders | ||
==Troubleshooting== | ==Troubleshooting== | ||
If you experience issues transferring content or with Virtual Robot in general please see [[Virtual Robot Troubleshooting]] | If you experience issues transferring content or with Virtual Robot in general please see [[Virtual Robot Troubleshooting]] | ||
Revision as of 16:11, 22 September 2017
Virtual Robot > Virtual Robot Content Organizer
This page applies to 2017 onwards Tritium robots, for earlier Tritium robots please see Virtual Robot - Transferring Content, for IOServe based robots please see Virtual Robot - Transferring Content (IOServe)
Contents
- 1 Introduction
- 2 Accessing the Content Organizer
- 3 Content Organizer Overview
- 4 Properties
- 5 Some useful shortcuts
- 6 Troubleshooting
Introduction
Virtual Robot provides a simple to use but powerful web based tool for content creation on Engineered Arts robots like RoboThespian and SociBot.
The Content Organizer is used to arrange touch screen and Telepresence content, add button images and text labels; transfer new performances and synchronise updates to performances with your robot, even while the robot is switched off.
Accessing the Content Organizer
The content organizer can be accessed from the Robot Management System:
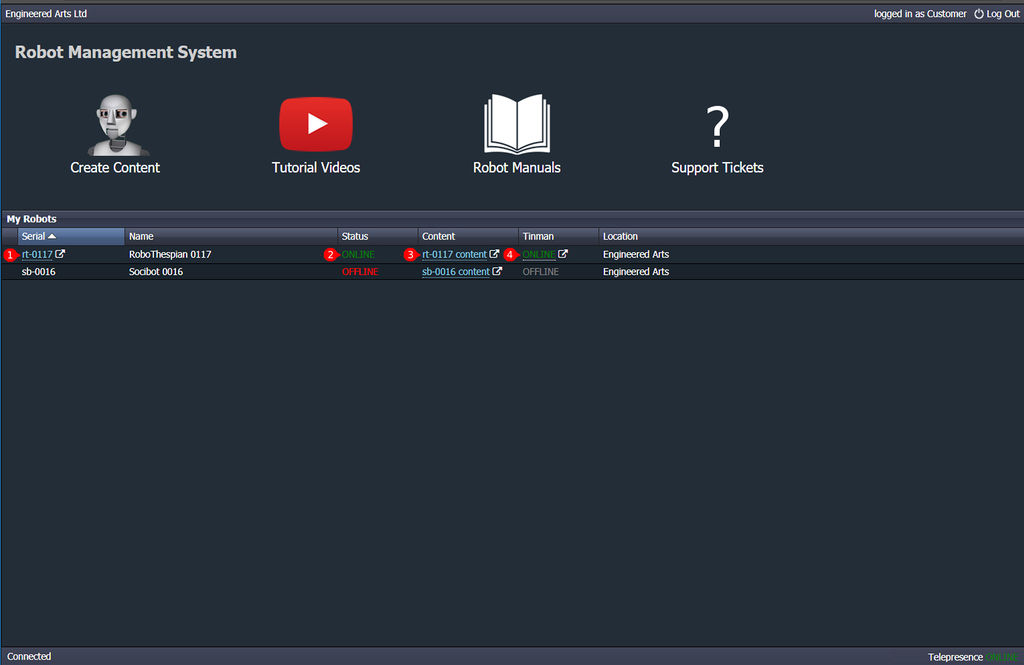
Serial number of robot - when robot is ONLINE this becomes a link. Click the link to open the robot's Tritium GUI
Status of robot - ONLINE / OFFLINE
Link to robot's content - click to open Virtual Robot Content Organizer
Tinman status - when robot has telepresence installed and is ONLINE, click here to access the Tinman Telepresence System
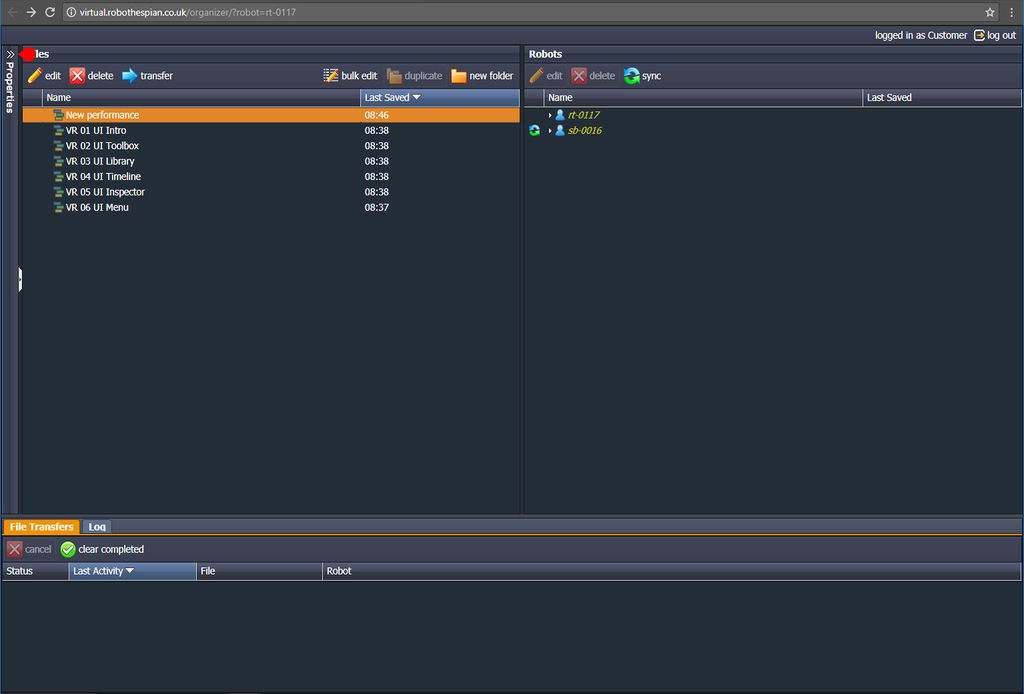
Content Organizer Overview
Virtual Robot Content Organizer is composed of 4 sections:
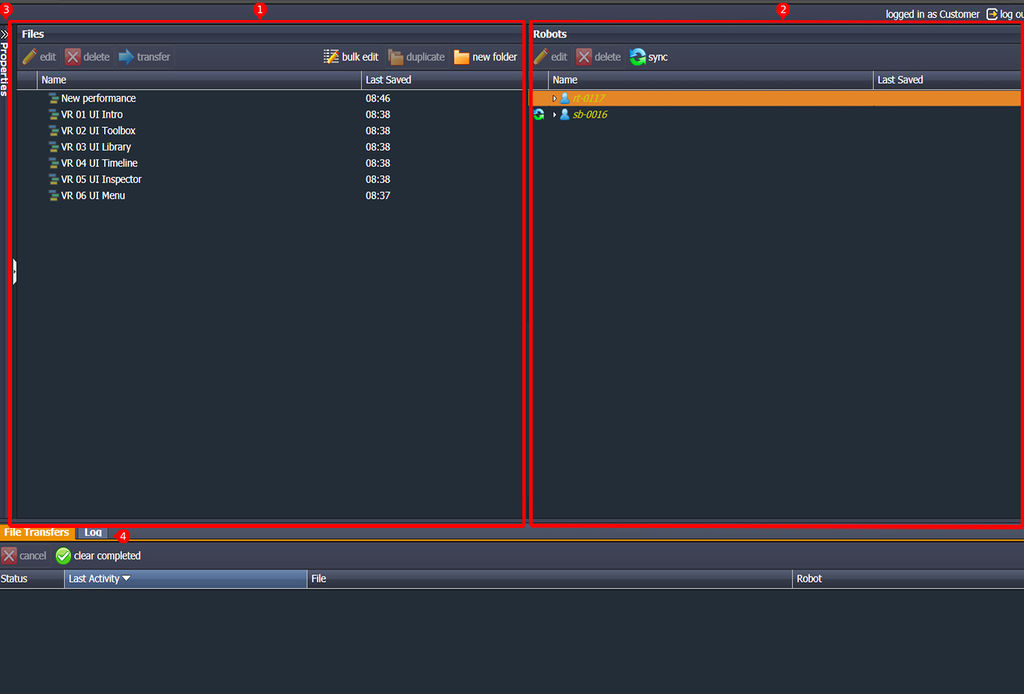
Files panel: performances in your Virtual Robot account
Robots panel: performances already on your robot or ready to sync to your robot
Properties panel (hidden by default): edit the Properties of performances and manage their appearance on the
File transfers and log: status of transfers
Files panel: Performances in Virtual Robot
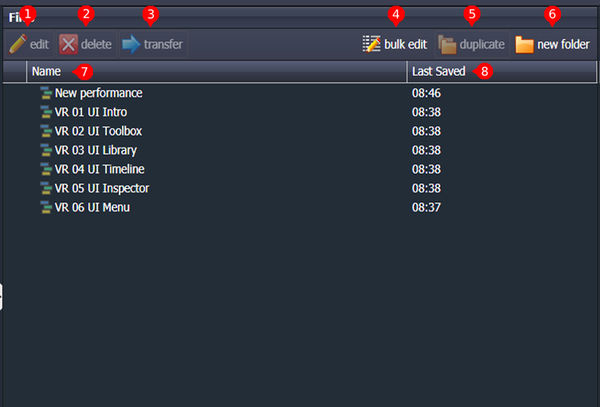
Edit: open selected performance in Virtual Robot for editing. You can also double click a performance to edit it.
Delete: delete selected performance from Virtual Robot permanently
Transfer: transfers performance to the robot archive folder (rather than directly to the Touch screen or Telepresence interface)
Bulk Edit: easily edit properties of multiple performances
Duplicate: duplicate the selected folder and its performances. Duplicates are unique copies that can be edited without affecting the originals.
New Folder: create folders to organise content.
Performances are listed below, clicking on Name to sort by name
Last Saved: date or time (if today) performance was last saved. Click on Last Saved to sort by Last Saved.
Robots panel: performances already on your robot or ready to sync to robot
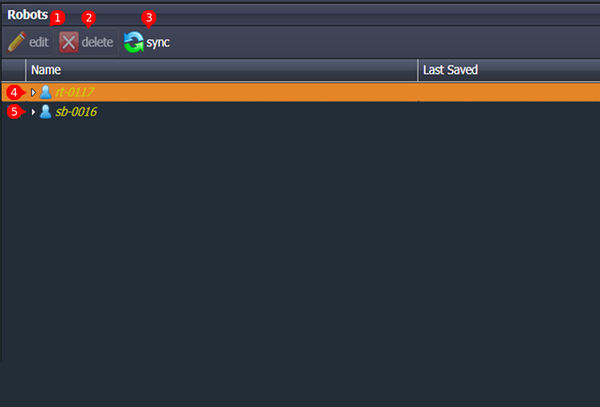
Edit: open selected performance in Virtual Robot for editing. You can also double click a performance to edit it.
Delete: delete selected performance from robot. Performance still exists in Virtual robot until deleted from Virtual Robot.
Sync: sync new or altered performances from Virtual Robot to the robot
, User's robots. Click the arrow next to a robot to show all the subfolders containing content on the robot.
Clicking the arrow again hides the subfolders. You can also double click on the Robot to expand / hide subfolders
File Transfers and Log
Shows status of current sync requests. Clicking on a robot to sync content to and pressing the Sync button adds a "pending" sync job to the File Transfers list.
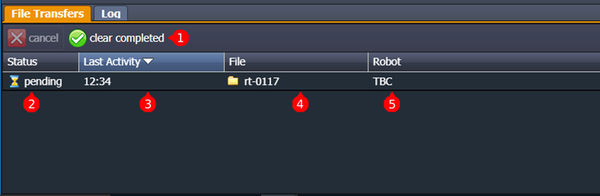
cancel: cancel selected sync job
clear completed: remove completed sync jobs from the list
Status: pending / completed
Last Activity: date and time sync job was added if pending, or date and time completed
File: performance or folder being synced
Robot: Name (or location) of robot
Once the robot is online it will begin to synchronise. When the content has been transferred to the robot the Status will show as "completed".
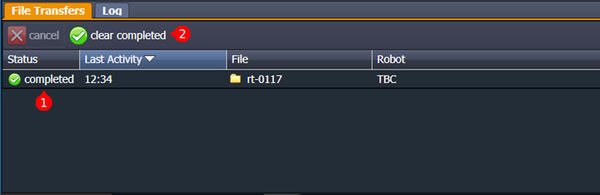
Status: completed transfer of performance or folder
clear completed: remove completed sync jobs from the list
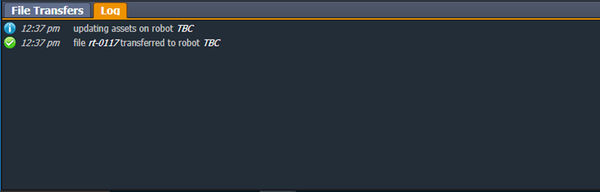
Log: logs actions carried out in Virtual Robot Content Organizer
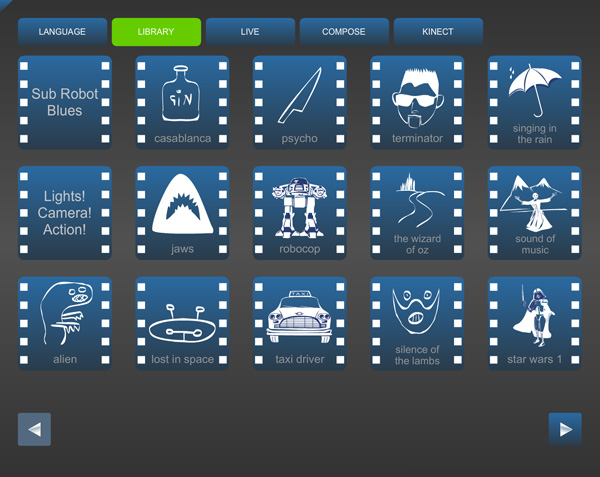
Transferring content to Touch Screen kiosk - LIBRARY page
Example LIBRARY page showing on the touch screen:
In the Robots panel select the Robot you wish to transfer performances to.
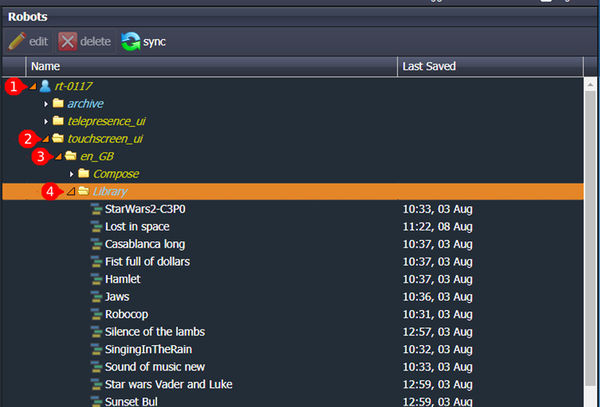
Click the arrow next to the Robot you wish to sync content to. This shows all the subfolders containing content on the robot. (Clicking the arrow again hides the subfolders. You can also double click on the Robot to expand / hide subfolders)
Click the arrow next to 'touchscreen_ui' to show the subfolders for content in different languages on the Robot
Click the arrow next to 'en_GB' (for British English touch screen content) - if you have other languages installed they will appear here as well. This folder this contains all editable pages of the touch screen interface
Click the arrow next to 'Library' to show the Library content in the order it appears on the touch screen kiosk
Let's say you want to add a new performance to the LIBRARY page.
Select the performance you want to add in the Files panel on the left and drag it into the Library folder of the Robots panel on the right.
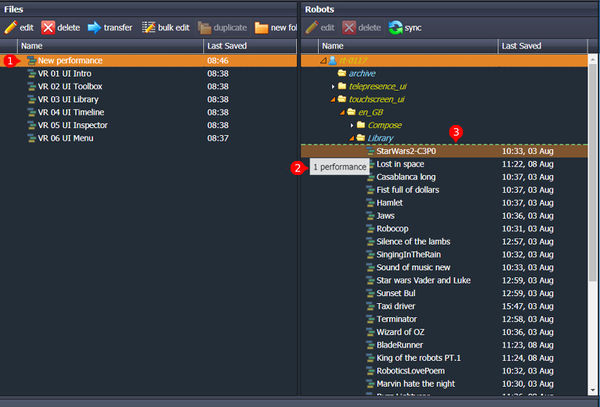
Drag selected performance from Files panel into the Library folder .
A dialog box indicates how many performances are being dragged
Green dotted line indicates which folder performance or folder is being dragged to
- Add any other new performances in the same way.
- Change order of performances in the Library folder by dragging performances around
- Delete any performances in Library if no longer wanted.
Then sync the changes to the robot
Syncing content changes to robot
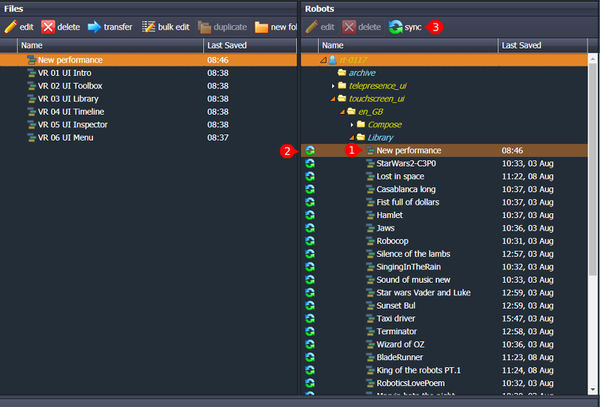
Transferred performance in library from example above
Sync symbol indicates items that will be synced (i.e. updated or transferred or re-ordered)
Click Sync to add the sync job to the File Transfers list and initiate the changes
Once the robot is online it will begin to synchronise. When the content has been transferred to the robot the Status will show as "completed".
To see the updated content on your touch screen, change to one of the other pages on your touch screen (e.g. LIVE or LANGUAGE) then click on LIBRARY again to reload the LIBRARY page - you should now see all your changes.
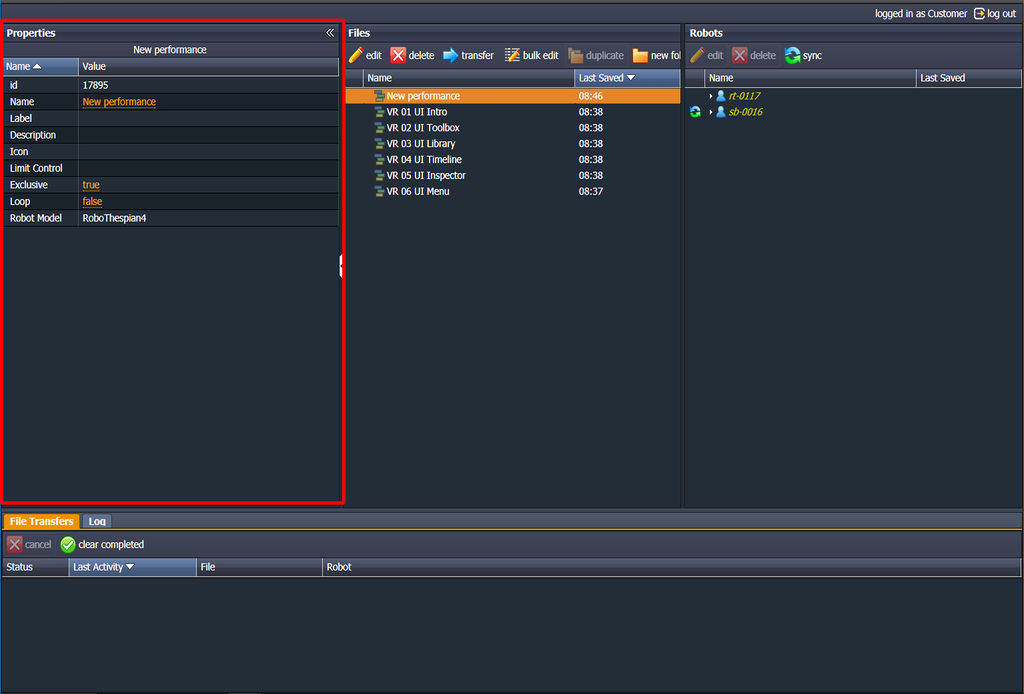
Properties
Access the properties panel by clicking on the ">>" :
This opens the Properties panel
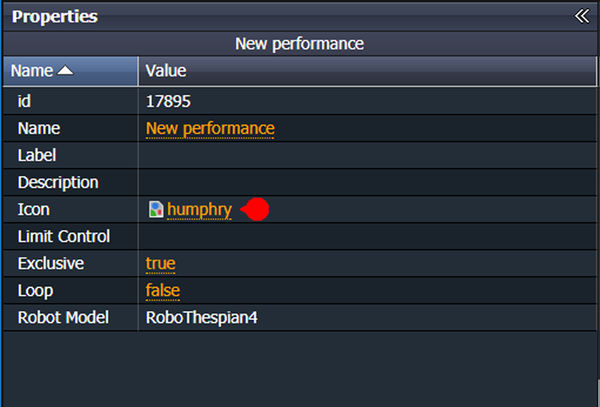
Select a sequence in Files that you wish to change the properties of. The following properties are availabnle
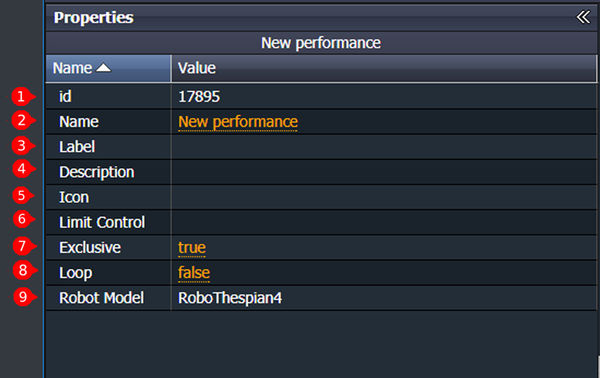
ID: unique ID number (For info - can not be altered)
Name: Sequence name
Label: Button label that appears on the Touch Screen interface
Description: Use to describe your content if desired (does not appear on touch screen)
Icon: Select an icon to use on the Button on the Touch Screen or in the Telepresence interface
Limit Control: Limit the sequence in Tritium Arbitration to only control certain parts of the robot (no need to change if unfamiliar with Arbitration)
Exclusive: Arbitration related, no need to change if unfamiliar with Arbitration
Loop: For Telepresence loops - sequences that will loop until told to stop
Robot Model: For info - robot model the sequence was created for.
Icon selection
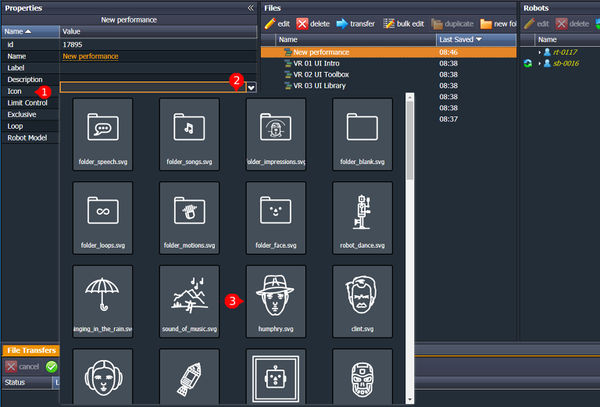
Click in the empty box next to Icon this will open Icons window
Here you can select an existing icon e.g. humphrey , or scroll to the bottom of the icons and click "+ Upload" to upload your own.
The icon property will update to the selected icon:
After making any changes in properties hit sync again to sync the changes to the robot.
Clicking the "<<" symbol closes the properties panel
Some useful shortcuts
- slow click folder or performance name to rename
- double click folder to open
- double click performance to edit
- click an arrow next to a folder to show / hide subfolders
- double click on a folder to show / hide subfolders
Troubleshooting
If you experience issues transferring content or with Virtual Robot in general please see Virtual Robot Troubleshooting