Difference between revisions of "RoboThespian Quickstart"
(→Do's and Don'ts) |
|||
| (87 intermediate revisions by the same user not shown) | |||
| Line 1: | Line 1: | ||
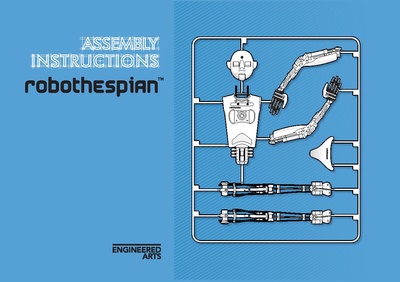
| − | + | [[File:RoboThespian Assembly and Safety Instructions.pdf|400px|thumb|Downloadable RoboThespian Assembly and Safety Instructions (pdf)|right]][[Category: Introduction]] | |
| − | [[Category: | ||
[[Category:User_Manual]] | [[Category:User_Manual]] | ||
| − | [[Category: RoboThespian]] | + | [[Category: RoboThespian]] |
| + | [[RoboThespian]] >> RoboThespian Quickstart | ||
=Quick Start Guide= | =Quick Start Guide= | ||
| − | |||
==Introduction== | ==Introduction== | ||
| − | This is a guide to first installation and operation of RoboThespian. | + | This is a guide to first installation and operation of [[RoboThespian]] aimed at new customers. |
| + | |||
| + | You can also view or download the printable RoboThespian Assembly and Safety Instructions from the image on the top right of this page. | ||
== Minimum Installation Requirements == | == Minimum Installation Requirements == | ||
| − | {{#lst:RoboThespian Installation Overview | + | {{#lst:RoboThespian Installation Overview and Requirements|installation requirements}} |
==Do's and Don'ts== | ==Do's and Don'ts== | ||
| Line 18: | Line 19: | ||
<br> | <br> | ||
{{cross|16}} Don't allow visitors to touch RoboThespian<br> | {{cross|16}} Don't allow visitors to touch RoboThespian<br> | ||
| − | {{cross|16}} Don't disconnect any air or electrical connections while RoboThespian is | + | {{cross|16}} Don't disconnect any air or electrical connections while RoboThespian is connected to the mains or has the compressed air supply connected<br> |
{{cross|16}} Don't use solvent cleaners or abrasive pads on RoboThespian<br> | {{cross|16}} Don't use solvent cleaners or abrasive pads on RoboThespian<br> | ||
{{cross|16}} Don't make modifications or alterations to any settings without consulting the manufacturer first<br> | {{cross|16}} Don't make modifications or alterations to any settings without consulting the manufacturer first<br> | ||
| Line 24: | Line 25: | ||
{{cross|16}} Don't hotplug any cables. Shut down robot and disconnect mains power before plugging / unplugging any cable<br> | {{cross|16}} Don't hotplug any cables. Shut down robot and disconnect mains power before plugging / unplugging any cable<br> | ||
| − | == | + | ==Safe Operation== |
| − | + | Supervisors working in robot area must be familiar with the safety guidelines in the RoboThespian Assembly and Safety Instructions. If you do not have a printed copy we recommend printing the downloadable [[Media:RoboThespian_Assembly_and_Safety_Instructions.pdf|RoboThespian Assembly and Safety Instructions (pdf)]] and keeping at the robot's location. | |
| − | |||
| − | |||
| − | < | + | The key points are repeated here:<br> |
| − | < | + | {{cross|16}} Keep hands and fingers well away from any moving parts while the robot is switched on - it may move at any time without warning!<br> |
| − | < | + | {{cross|16}} Never reach inside the body, head or legs when the robot is powered!<br> |
| − | + | {{cross|16}} In the event of an air leak / burst air muscle switch off the air at the blue valve<br> | |
| + | {{tick|16}} We recommend all supervisors make themselves familiar with the online documentation at https://wiki.engineeredarts.co.uk/<br> | ||
| + | [[File:Shut off valve to off.png|150px|thumb|none|Shut off valve -> off]] | ||
| − | == | + | ==Unpacking and Assembly== |
| − | + | How to unpack and assemble your robot. | |
| − | |||
| − | |||
| − | |||
| − | |||
| − | |||
<div><ul> | <div><ul> | ||
| − | <li style="display: inline-block;">[[File: | + | <li style="display: inline-block;">[[File:RoboThespian-Tutorial-One-Out-of-the-box-v5.jpg|thumb|none|400px|link=RoboThespian_Unpacking_and_Assembly|RoboThespian in boxes]]</li> |
| − | + | <li style="display: inline-block;">[[File:RoboThespian-Tutorial-One-Out-of-the-box-v6.png|thumb|none|400px|link=RoboThespian_Unpacking_and_Assembly|RoboThespian Assembled]]</li> | |
| − | <li style="display: inline-block;">[[File: | ||
</ul></div> | </ul></div> | ||
| − | + | See [[RoboThespian_Unpacking_and_Assembly|RoboThespian Unpacking & Assembly]] and watch the video. | |
| − | |||
| − | |||
| − | |||
| − | + | ==Setting up the supplied compressor== | |
| − | + | If your RoboThespian is supplied with a compressor please see [[Compressor_Unpacking_and_Assembly|Compressor Unpacking and Assembly]] | |
| − | |||
| − | |||
| − | |||
| − | |||
| − | |||
| − | |||
<div><ul> | <div><ul> | ||
| − | <li style="display: inline-block;">[[File: | + | <li style="display: inline-block;">[[File:compressor.jpg|thumb|none|400px|link=Compressor_Unpacking_and_Assembly|Compressor]]</li> |
| − | |||
</ul></div> | </ul></div> | ||
| − | == | + | ==Starting up RoboThespian== |
| − | + | RoboThespian and the touchscreen kiosk will start up automatically as soon as they are plugged into the mains power. | |
| − | + | ==Control your RoboThespian from the touchscreen kiosk== | |
| − | + | The [[Touchscreen|touchscreen kiosk]] offers you and your visitors an intuitive and easy way to interact with RoboThespian. | |
| − | |||
| − | |||
| − | |||
| − | |||
| − | |||
| − | |||
| − | |||
| − | + | Now that your robot is up and running, get familiar with the features of the [[Touchscreen]] | |
| − | |||
| − | |||
| − | |||
| − | |||
<div><ul> | <div><ul> | ||
| − | <li style="display: inline-block;">[[File: | + | <li style="display: inline-block;">[[File:main_touchscreen_v2.jpg|thumb|none|400px|link=Touchscreen|RoboThespian Touchscreen]]</li> |
| − | |||
| − | |||
| − | |||
</ul></div> | </ul></div> | ||
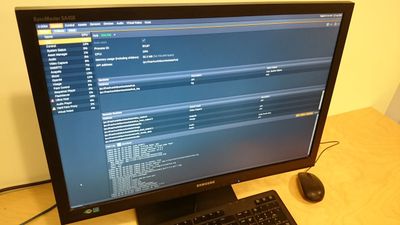
| − | + | ==Access RoboThespian's Control Panel== | |
| + | When connected to the internet, you can access and control RoboThespian and modify settings.<br> | ||
| + | Please see [[Control Panel]] for further details. | ||
<div><ul> | <div><ul> | ||
| − | <li style="display: inline-block;">[[File: | + | <li style="display: inline-block;">[[File:main_control_panel.jpg|thumb|none|400px|link=Control Panel|Control Panel]]</li> |
| − | |||
| − | |||
</ul></div> | </ul></div> | ||
| − | + | You can access this remotely when the robot is connected to the internet - see [[Remote Connection]]<br> | |
| − | + | If you have issues connecting to your RoboThespian over your LAN or remotely, please see [[Network Setup]] | |
| − | |||
| − | |||
| − | |||
| − | |||
| − | |||
| − | |||
| − | |||
| − | |||
| − | |||
| − | |||
| − | |||
| − | |||
| − | |||
| − | |||
| − | |||
| − | |||
| − | |||
| − | |||
| − | |||
| − | |||
| − | |||
| − | |||
| − | |||
| − | |||
| − | |||
| − | |||
| − | |||
| − | |||
| − | |||
| − | |||
| − | |||
| − | |||
| − | |||
| − | |||
| − | |||
| − | |||
| − | |||
| − | |||
| − | |||
| − | |||
| − | |||
| − | |||
| − | |||
| − | |||
| − | |||
| − | |||
| − | |||
| − | |||
| − | |||
| − | |||
| − | |||
| − | |||
| − | |||
| − | |||
| − | |||
| − | |||
| − | |||
| − | |||
| − | |||
| − | |||
| − | |||
| − | |||
| − | |||
| − | |||
| − | |||
| − | |||
| − | |||
| − | |||
| − | |||
| − | |||
| − | |||
| − | |||
| − | |||
| − | |||
| − | |||
| − | |||
| − | |||
| − | |||
| − | |||
| − | |||
| − | |||
| − | |||
| − | |||
| − | |||
| − | |||
| − | |||
| − | |||
| − | |||
| − | |||
==Shutdown procedure== | ==Shutdown procedure== | ||
RoboThespian contains a PC and like any PC should be shut down fully before removing mains power. | RoboThespian contains a PC and like any PC should be shut down fully before removing mains power. | ||
| − | + | Please see [[RoboThespian_Shut_Down|RoboThespian Shut Down]] for further details. | |
| − | |||
| − | |||
| − | |||
| − | |||
| − | |||
| − | |||
| − | |||
| − | |||
| − | |||
| − | |||
| − | |||
| − | |||
| − | |||
| − | |||
| − | |||
| − | |||
| − | |||
| − | |||
| − | |||
| − | |||
| − | |||
| − | |||
| − | |||
| − | |||
<div><ul> | <div><ul> | ||
| − | <li style="display: inline-block;">[[File: | + | <li style="display: inline-block;">[[File:shutdown_icons.jpg|thumb|none|400px|link=RoboThespian_Shut_Down|RoboThespian Shut Down]]</li> |
| − | |||
| − | |||
| − | |||
</ul></div> | </ul></div> | ||
==Explore further features== | ==Explore further features== | ||
| − | See | + | See [[Main_Page#Features|Features]] and click on a feature to find out more |
For more information and troubleshooting, please explore the links in the wiki, http://wiki.engineeredarts.co.uk/, or contact Engineered Arts if you can not find the information you are looking for in the wiki. | For more information and troubleshooting, please explore the links in the wiki, http://wiki.engineeredarts.co.uk/, or contact Engineered Arts if you can not find the information you are looking for in the wiki. | ||
Latest revision as of 10:09, 31 August 2023
RoboThespian >> RoboThespian Quickstart
Contents
- 1 Quick Start Guide
- 1.1 Introduction
- 1.2 Minimum Installation Requirements
- 1.3 Do's and Don'ts
- 1.4 Safe Operation
- 1.5 Unpacking and Assembly
- 1.6 Setting up the supplied compressor
- 1.7 Starting up RoboThespian
- 1.8 Control your RoboThespian from the touchscreen kiosk
- 1.9 Access RoboThespian's Control Panel
- 1.10 Shutdown procedure
- 1.11 Explore further features
Quick Start Guide
Introduction
This is a guide to first installation and operation of RoboThespian aimed at new customers.
You can also view or download the printable RoboThespian Assembly and Safety Instructions from the image on the top right of this page.
Minimum Installation Requirements
- Suitable for indoor use only. Recommended room temperature: 10°C - 30°C, relative humidity: 45% - 60%
- Standard domestic mains power in the range 100v - 250v AC
- A barrier to prevent contact between visitors and RoboThespian.
- Wired internet network connection with good bandwidth - see Network Setup. Required for TinMan Telepresence , remote administration and support, and the application of updates and new software/content features.
- Un-oiled, compressed air at 6bar (87psi), filtered to 10µm. Peak air consumption 30L/min (7.9 US gpm) at 6bar (87psi) maximum, on average consumption is much less (Engineered Arts can supply a suitable portable air compressor unit if no fixed supply available)
- Airline connection to robot is via an 8mm (5/16in) outside diameter Push-In-Fitting.
- Extra 8mm (5/16in) outside diameter polyeurethane tubing can be supplied on request.
Do's and Don'ts
![]() Do follow the instructions in this wiki
Do follow the instructions in this wiki
![]() Do maintain your RoboThespian to ensure it operates safely
Do maintain your RoboThespian to ensure it operates safely
![]() Do switch off your RoboThespian if it is damaged or malfunctioning
Do switch off your RoboThespian if it is damaged or malfunctioning
![]() Do treat your RoboThespian with care and respect
Do treat your RoboThespian with care and respect
![]() Don't allow visitors to touch RoboThespian
Don't allow visitors to touch RoboThespian
![]() Don't disconnect any air or electrical connections while RoboThespian is connected to the mains or has the compressed air supply connected
Don't disconnect any air or electrical connections while RoboThespian is connected to the mains or has the compressed air supply connected
![]() Don't use solvent cleaners or abrasive pads on RoboThespian
Don't use solvent cleaners or abrasive pads on RoboThespian
![]() Don't make modifications or alterations to any settings without consulting the manufacturer first
Don't make modifications or alterations to any settings without consulting the manufacturer first
![]() Don't remove any covers to electrical components unless instructed to do so
Don't remove any covers to electrical components unless instructed to do so
![]() Don't hotplug any cables. Shut down robot and disconnect mains power before plugging / unplugging any cable
Don't hotplug any cables. Shut down robot and disconnect mains power before plugging / unplugging any cable
Safe Operation
Supervisors working in robot area must be familiar with the safety guidelines in the RoboThespian Assembly and Safety Instructions. If you do not have a printed copy we recommend printing the downloadable RoboThespian Assembly and Safety Instructions (pdf) and keeping at the robot's location.
The key points are repeated here:
![]() Keep hands and fingers well away from any moving parts while the robot is switched on - it may move at any time without warning!
Keep hands and fingers well away from any moving parts while the robot is switched on - it may move at any time without warning!
![]() Never reach inside the body, head or legs when the robot is powered!
Never reach inside the body, head or legs when the robot is powered!
![]() In the event of an air leak / burst air muscle switch off the air at the blue valve
In the event of an air leak / burst air muscle switch off the air at the blue valve
![]() We recommend all supervisors make themselves familiar with the online documentation at https://wiki.engineeredarts.co.uk/
We recommend all supervisors make themselves familiar with the online documentation at https://wiki.engineeredarts.co.uk/

Unpacking and Assembly
How to unpack and assemble your robot.
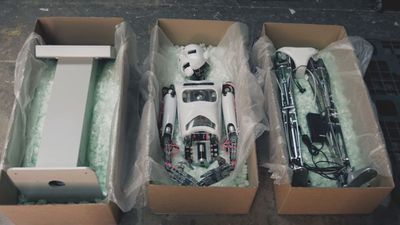
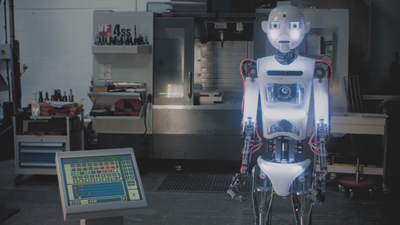
See RoboThespian Unpacking & Assembly and watch the video.
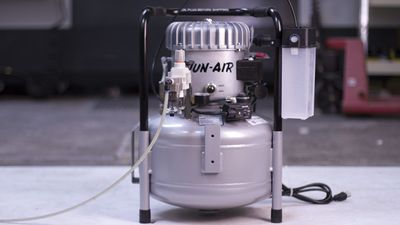
Setting up the supplied compressor
If your RoboThespian is supplied with a compressor please see Compressor Unpacking and Assembly
Starting up RoboThespian
RoboThespian and the touchscreen kiosk will start up automatically as soon as they are plugged into the mains power.
Control your RoboThespian from the touchscreen kiosk
The touchscreen kiosk offers you and your visitors an intuitive and easy way to interact with RoboThespian.
Now that your robot is up and running, get familiar with the features of the Touchscreen

Access RoboThespian's Control Panel
When connected to the internet, you can access and control RoboThespian and modify settings.
Please see Control Panel for further details.
You can access this remotely when the robot is connected to the internet - see Remote Connection
If you have issues connecting to your RoboThespian over your LAN or remotely, please see Network Setup
Shutdown procedure
RoboThespian contains a PC and like any PC should be shut down fully before removing mains power.
Please see RoboThespian Shut Down for further details.
Explore further features
See Features and click on a feature to find out more
For more information and troubleshooting, please explore the links in the wiki, http://wiki.engineeredarts.co.uk/, or contact Engineered Arts if you can not find the information you are looking for in the wiki.