Difference between revisions of "SociBot Kiosk v1 Unpacking and Assembly"
| Line 1: | Line 1: | ||
''This page is for early [[SociBot]] Kiosk version 1 models. If you are not sure of your robot model please check the [[Serial Number Identification|Serial Number plate]] or [mailto:info@engineeredarts.co.uk contact Engineered Arts]'' | ''This page is for early [[SociBot]] Kiosk version 1 models. If you are not sure of your robot model please check the [[Serial Number Identification|Serial Number plate]] or [mailto:info@engineeredarts.co.uk contact Engineered Arts]'' | ||
| − | ''Mechanical assembly of newer SociBots is similar. | + | ''Mechanical assembly of newer SociBots is similar. Please see [[SociBot_Kiosk_Unpacking_and_Assembly]].'' |
[[SociBot]] >> SociBot Unpacking and Assembly | [[SociBot]] >> SociBot Unpacking and Assembly | ||
Latest revision as of 10:26, 6 December 2016
This page is for early SociBot Kiosk version 1 models. If you are not sure of your robot model please check the Serial Number plate or contact Engineered Arts
Mechanical assembly of newer SociBots is similar. Please see SociBot_Kiosk_Unpacking_and_Assembly.
SociBot >> SociBot Unpacking and Assembly
Overview
Your Socibot installation will come mostly assembled. All that should be required is to mount the body on the plinth, connect the appropriate cables/sockets, and attach the arms. A detailed guide to these steps follows.
Mount Socibot on the kiosk plinth
Take Socibot out of the box. We recommend two people for this portion of the assembly. Holding both the body and head, feed the attached cables down the central plinth hole as shown.


The four connector screws will help align Socibot on the plinth. Ensure the cables are clear of other kiosk componenets, and that Socibot sits flush with the top of the plinth.


Socibot is secured to the plinth by four wingnuts (provided), which are accessible from underneath the top of the plinth.

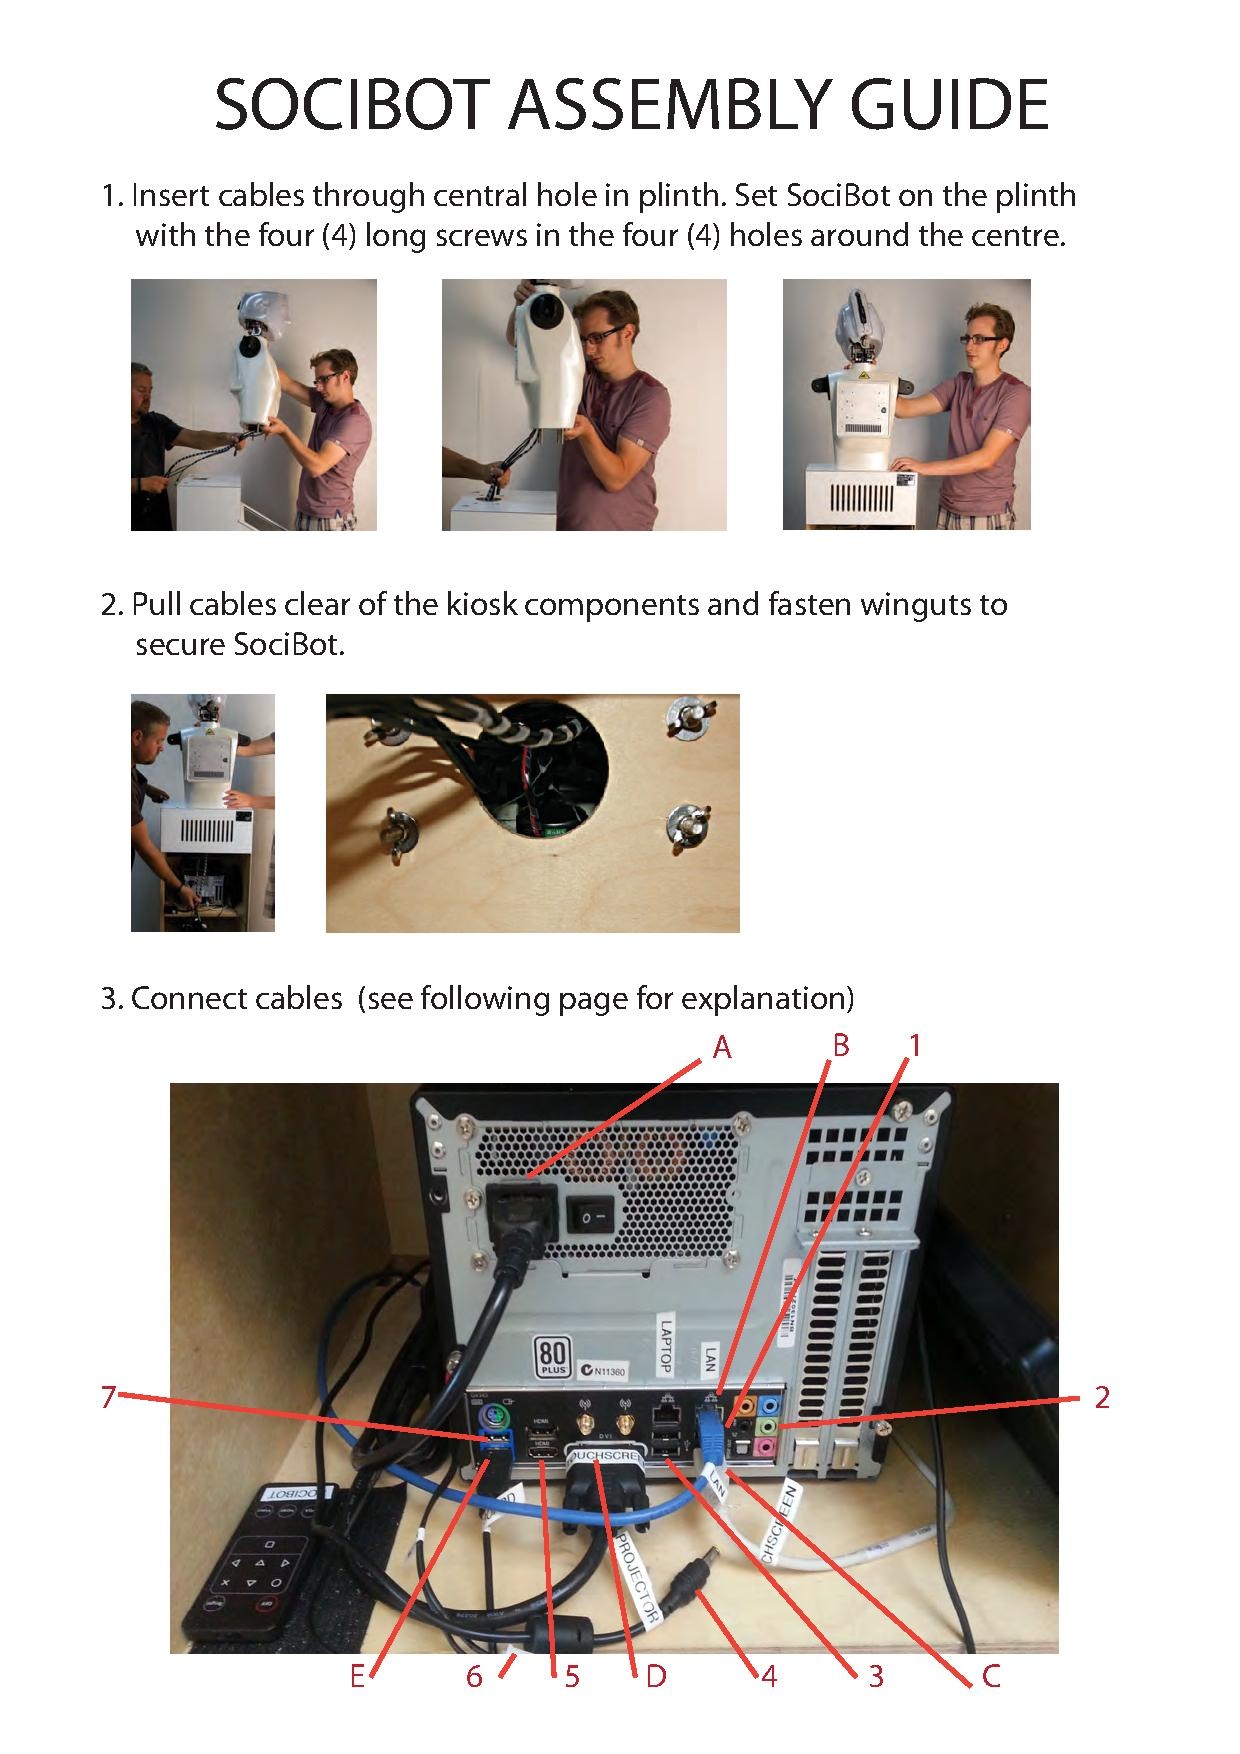
Connect cables
Connect the cables to Socibot's PC according to the following guide. Note that some connections (eg LAN) may already be connected before shipping. Take particular care with the USB ports, as some devices will only work in the USB 3.0 ports (blue on the PC) and others only in USB 2.0 ports (black). Note also that when connecting to a LAN, the right hand ethernet port should be used. To connect your laptop directly to the robot, use the left-hand ethernet port (the robot will assign an IP address to your laptop via DHCP). Connecting the left hand port to a LAN will cause problems with the IP assignment.

Cables to connect during assembly:
1. USB xtion depth sensor (upper of two black USB port)
2. Audio to robot speaker (green socket)
3. USB to robot motion board (black USB port) (cable marked USB)
4. Projector power jack
5. HDMI to projector (bottom HDMI port only!)
6. Hard to see in photo - power connection for motion board and amplifier
7. USB 3.0 Head Camera (upper of blue USB 3.0 ports)
B. LAN connection - connect other end to your network (required for remote support)
For info: cables already connected prior to shipping:
A. Mains power
B. LAN connection to customer network (NB right hand of 2 sockets)
C. USB touchscreen connection (black USB port)
D. DVI touchscreen connection (black USB port)
E. USB keyboard (blue USB 3.0 port)
All cables connected:

Please note power for the projector hangs down near top of kiosk:

Connect the power plug and socket marked torso power (provides power to the motion board and amplifier)

Your console should be shipped with an ethernet cable (already connected to the LAN socket in the PC), and a power cable.

Attach the arms

Socibot's arms slot into place. Ensure the shoulder holes are lined up:

Then simply secure with the screw attachments provided.

Your Socibot should now be fully functional and ready to switch on.
